


 The blocks themselves are just pieces of a sliced 2x4. You could easily purchase them from a craft store, but you'll probably ended up spending more money. I painted the first three black and the last one orange, then roughed the edges a bit with some sand paper. For the checker-board "stencil" I just took a small piece of wood, painted the edge, and stamped it on! No actual stencil was used. Some of the other women painted an exclamation point on the last block as well, but I liked leaving it for creative decor. Plus, it gives me some options: I can leave it at the end, put it at the beginning, stack it on one of the other blocks, leave it out all together, etc. The lettering was cut with a Cricut, but with only three letters, you could easily cut them from paper or even paint them on!. Finally, I embellished the blocks with little foam stickers.

Friday, October 29, 2010
Boo Blocks
I'm usually not one for Halloween decor (purely because I do not enjoy the holiday, and I prefer fall-themed decor so I can leave it out for a few months rather than a few weeks), but these were super-simple and cute. I cannot take credit for the idea (I made it at a church enrichment activity), but I can take credit for the fabulous blocks you see! The blocks themselves are just pieces of a sliced 2x4. You could easily purchase them from a craft store, but you'll probably ended up spending more money. I painted the first three black and the last one orange, then roughed the edges a bit with some sand paper. For the checker-board "stencil" I just took a small piece of wood, painted the edge, and stamped it on! No actual stencil was used. Some of the other women painted an exclamation point on the last block as well, but I liked leaving it for creative decor. Plus, it gives me some options: I can leave it at the end, put it at the beginning, stack it on one of the other blocks, leave it out all together, etc. The lettering was cut with a Cricut, but with only three letters, you could easily cut them from paper or even paint them on!. Finally, I embellished the blocks with little foam stickers.
The blocks themselves are just pieces of a sliced 2x4. You could easily purchase them from a craft store, but you'll probably ended up spending more money. I painted the first three black and the last one orange, then roughed the edges a bit with some sand paper. For the checker-board "stencil" I just took a small piece of wood, painted the edge, and stamped it on! No actual stencil was used. Some of the other women painted an exclamation point on the last block as well, but I liked leaving it for creative decor. Plus, it gives me some options: I can leave it at the end, put it at the beginning, stack it on one of the other blocks, leave it out all together, etc. The lettering was cut with a Cricut, but with only three letters, you could easily cut them from paper or even paint them on!. Finally, I embellished the blocks with little foam stickers.
Thursday, October 28, 2010
DIY Minnie Costume
Here's my version of a DIY Minnie Mouse costume
all you need is:
-1 pair of Minnie ears
-1 yard of Minnie polka dot fabric
-2 yards red tulle
- yellow shoes

I found THIS tutorial for the skirt,
and added a top piece and straps to make it
a dress.

And for the shoes I found these white ones
at The Salvation Army for 50 cents and spray
painted them yellow.
I stuffed them with newspaper to keep from
spraying the inside.

It came out exactly how I hoped
which is always a nice surprise!
Wednesday, October 27, 2010
Pillowcase Dress
Pillowcase dresses are an easy project for
first time sewers or beginner sewers.
It was the first project I ever did on my own, and
they turned out shockingly well.
Here's my little one at 5 months, modeling
her first pillowcase dress, made out of a
Pottery Barn pillowcase

This one I made for her at Easter,
also a PB Teen sham

And this one is for next summer,
also PBTeen (I get them at the outlets for
a few dollars)

Check out THIS tutorial that I used to make mine!
Tuesday, October 26, 2010
Thankful Wall
Since I was a little girl, we have had a tradition in my family to have a "Thankful Wall" during Thanksgiving. This is this year's version that I created!


Usually the Thankful Wall consists of a large sheet from a big roll of poster paper stapled to the wall.
We leave it up from the beginning of November throughout the Thanksgiving holiday and we all get to write down the things that we can think of that we are thankful for. It has been such a fun tradition, and I look forward to the Thankful Wall every year. I even had one with my roommates when I was single and in college. It's especially fun to have if you are the one hosting Thanksgiving Dinner so that all the guests can write down what they are thankful for. It definitely helps keep the meaning of Thanksgiving on your mind.
This year, I had decided to put a little more into our Thankful Wall. I have had this huge frame that I got at a thrift store for like $2 that has been hanging around my house.
It's an odd size, so I haven't been able to find any canvases to paint or prints to put in it. So I decided to do the DIY chalkboard from our earlier post by Kristin, found HERE, and make a Thankful Wall that we can use year after year.
I spray painted the frame white, used some chalkboard paint on a masonite board we cut for the inside (and by saying "we" I mean my amazing husband), and I cut out some white vinyl on my cricut for the "I am thankful for" part. I found some perfect little cornucopia shaped baskets that I added some ribbons to and nailed them to the frame to use to hold the chalk too!
I let my little boy write what he was thankful for on there too, because he was just begging to use the chalk on the chalkboard when I put it up. I think I see a tree in there somewhere...it's fun to interpret.
Some of you may notice the "bloating" listed as what someone was thankful for in the last picture. I had originally wrote boating, but my husband came home and asked me why I wrote bloating down on the Thankful Wall. Obviously he just didn't see it right, but after noticing that, he decided to put an "l" in there anyway, and I just left it there. It seems like every year there is a little joke with the Thankful Wall. It's part of the fun!
Some great ideas for variations that viewers have given me are:
- use a framed dry-erase board
- if you have the glass for your frame, you can leave it in there and use dry-erase markers, and even do a cute background behind your glass
- leave the board up all year long, with or without the vinyl
So now you know how to start your own Thankful Wall, if you haven't already! It will be a tradition you look forward to every year that helps keep the meaning of Thanksgiving alive.
***Since I posted this, my husband has added "Power Tools" to the Thankful Wall. I just had to write next to it, "...and that I benefit from the power tools too!" because he is always busy helping me with some new crafty project that requires power tools. So I've also added, "my husband" to the wall. I couldn't have asked for a better one! Oh the list keeps getting bigger and bigger. There are just so many things to be thankful for!
What are you thankful for?
This project was Jen's Pick at the CSI Project
Linked up with:
The CSI Project
Tuesday Tag-Along
We are participating in Twee Poppets' Tuesday Tag-Along!

This is a great way to discover new blogs while increasing the number of followers for your own blog.
Visit them to see how it all works and to get some new followers to your own blog!
Monday, October 25, 2010
Free Halloween/Fall/Thanksgiving Buttons
So, I was thinking I had one more week till Creative Freedom Week but had already made these Halloween buttons under my topic of blogging out of the shear excitement that Halloween is so close. So I still have to post them before they expire! Snag them before Halloween is over! And I did sneak in a Thanksgiving one for those of you that are thinking ahead. More Thanksgiving ones are coming soon...


Click HERE for more Halloween buttons, as well as instructions, if you need them, on how to install them onto your own blog.

And if you have any requests for sayings for future button freebies, for Thanksgiving, Christmas, etc., don't be shy! Leave a comment and I might just make a personalized one to fit your request! I'm gonna make the free buttons either way! You might as well get a personalized one out of it!

Linking up with:
Friday, October 22, 2010
Peanut Butter Truffle Brownies
These are sinfully delicious and you won't regret making them! Also, they're so stinkin' simple.
 1 box brownie mix (9x13 pan size)-follow box directions
FILLING:
1/2 c. butter, softened
1/2 c. peanut butter (creamy or chunky both work fine)
2 -3 c. powdered sugar
2 t. milk
TOPPING:
1 c. chocolate chips
1/4 c. butter
Cook brownies per box directions; cool. Beat filling mixture and spread over brownies. Microwave topping; stir until smooth. Cool for about ten minutes and then spread over the top. Refrigerate before serving.
Thursday, October 21, 2010
Halloween Decor
My home is lacking in the Halloween decor
so this week I decided to make a Halloween garland.
Here is a little tutorial.
-First I made a template from card stock for my pennants.
-I then cut out the fabric and sewed two together,
with the right sides facing in, leaving the top open
and they looked something like this:

-I then turned them right side out, ironed them
and stitched around the outside to give it a
more finished look, once again leaving the top open

-I then used bias tape (1") to conceal the open edge,
and string the pennants together

-I then hung it, and admired my new Halloween decor!

It was an easy and inexpensive project to get us
in the Halloween mood!
Wednesday, October 20, 2010
How to Make Your Feather Pillow Last Longer!
I absolutely love a good feather pillow. In fact, I can't sleep without the perfect pillow due to neck problems I have (curse that terrible posture)! The only problem with the perfect feather pillow is that they can be expensive, and once I find just the right one, it's usually too flat within a few months.
 I was telling my husband that I needed a new pillow, and he said we were spending way too much on them a year. I believe my sleep is of the utmost importance, so I was going to find a way to buy a new one regardless until a light bulb went off in my head! I seriously felt brilliant and dumb and the same time (for not thinking of it sooner).
I forced the feathers down, and I stitched a few inches from the end to seal the feathers in the other side. I was planning to stitch down the entire side, but I found it was fluffy enough part way down. As you can see, just a corner is stitched. It made my pillow fluffy again! Next time it gets too flat, I'll stitch down some more!
 This solution will save me over $100 dollars a year, and it took almost no time!
 Stay tuned next Wednesday for a belly band tutorial! I will also be giving away 2 custom made belly bands! You won't want to miss it!
Tuesday, October 19, 2010
ABC Blocks
The age of plain old ABC blocks has come and gone.
You remember them right,
they look something like this:

Here is a new set of DIY ABC blocks!

So fun to customize in any color scheme!
All you need is:
-2"x 2"x8' pieces of wood (purchased at Home Depot)
-a saw to cut the wood into square blocks
- a sander to sand the corners
-paint color of choice
-scrap book paper of choice
- ABC scrapbook letters
-Mod Podge
-paintbrushes
I love this Martha Stewart bandana paper,
it's just so fun and bright!

And a cute bucket to store them in!

It's the perfect gift for a 1st or 2nd Birthday
or Christmas!
In case you're not up for a DIY project at this time
they are for sale in my ETSY SHOP
Monday, October 18, 2010
Make a Slideshow Header
For today, here is one of my favorite secrets, the slideshow header! It is especially nice to have for those of you who have photography blogs!
There are a lot of ways to make a slideshow header, but many of them have limits. You can make your own HTML code for your own slideshow header, which requires time and knowledge of HTML. You can even use an image hosting website's option to make a slideshow and copy the code that they give you, but this limits you on customization for size, etc. With so many limits, this way stands out to me as the quickest and easiest ways to make a custom slideshow banner. All thanks to the HTML Basix site!
This is what you will need to do:
1. Make your images.
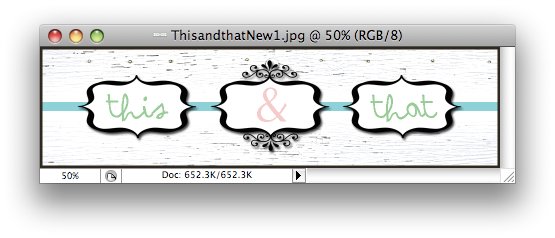
Start by making a header for your blog. Make it just like you would if you were making a normal header, size, etc., but plan on coordinating your header with one or more other images the same size as this header to complete your slideshow. Make the other images to go with it. Ours for This & That Creative has just has two images. I made a slideshow for my photography blog as well, and it has more images. HTML Basix will let you use up to 10 images.
If you make too big of a difference between your images, I think it can be a little in-your-face overwhelming to a viewer to have some big thing blinking so drastically. It all depends on what kind of blog you have too. For photography, it might be nice to show completely different images, but make sure that they are blinking through too quickly (HTML Basix gives you an option of how long you want each image to show).
Save these images on your computer, and make sure to take note of the dimensions of your images--you will be prompted to enter these dimensions in somewhere later.
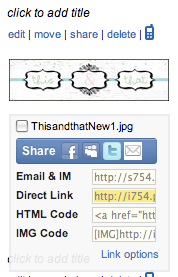
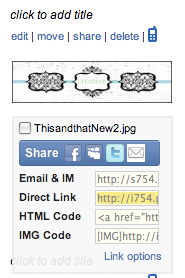
2. Upload your images to an image hosting site.
I like to use Photobucket, but you can use any image hosting site. After you upload and save your images, you will have access to different options of sharing your images. You will be using your images' direct links.
3. Make your slideshow code.
Open a new browser window so you can quickly copy your image direct links and paste them in this new web page you will open. Go to HTML Basix, HERE. It will show you something like this:
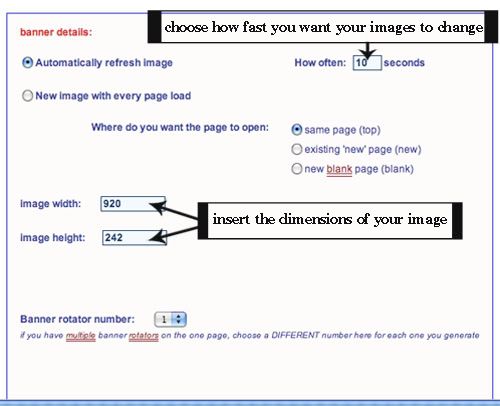
Enter in your selections exactly like I have entered here, except the only difference should be the width and height of your images, and how long you want each image to show before it changes to the next image.
If you scroll down, you will see this:
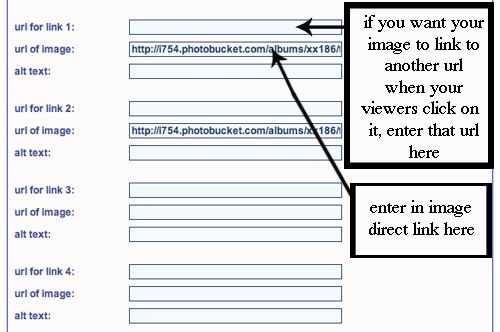
Each image will have three boxes you can enter text in for. You will paste in the direct links of each of your images where indicated. If you want an image to go to a certain link when someone clicks on that image, enter that in as well. The only box that you have to enter text in for your slideshow to work is the image url (direct link from image hosting site) for each image.
Click on the box at the bottom that says "Generate". You will see your slideshow code. You can use this code anywhere Blogger lets you enter in HTML/Javascript. For specific instructions on how to use this code for your header, continue to the next step.
4. Make your slideshow into your blog header.
Go to PAGE ELEMENTS in your DESIGN tab.

Click on the box that says ADD A GADGET. Select HTML/Javascript and enter in your new slideshow code and save. Now drag that new Gadget you made right underneath your header.
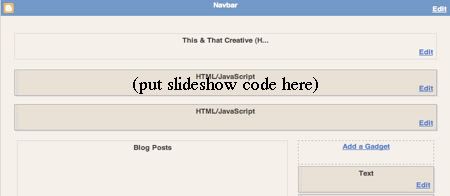
I have been able to delete the old header before, but some templates won't let you. If it won't let you delete your header, make a simple image with text/embellishments that will coordinate with your slideshow to replace the old header.
Save all your changes, and view your blog. Your slideshow should be there! (It will not show up as a slideshow on preview mode, but should still be working live!)
Enjoy your slideshow!
Saturday, October 16, 2010
Dr. Seuss Baby Shower
I love children's books, especially Dr. Seuss, and that may be why I absolutely love this baby shower that a girl I know threw! Madeline did an amazing job, and I wanted to highlight it for today's post.

Check out these real green eggs!


I love how she set up the fish hanging to look like they were swimming!

How about this giant The Cat in the Hat book cover that she made? Too fun!

She did another one for Oh, The Places You'll Go;
you can see it in the background in this next picture.


I love how everything ended up so colorful and played with so many of the themes
of a number of Dr. Seuss's books!
For Madeline's original post with all the party details, go HERE.
Another one of my friends threw a Dr. Seuss 1st birthday, which is a great idea too! Maybe I can get some pictures from her to add to this post later!
Subscribe to:
Posts (Atom)