Showing posts with label Gabe's Gifts. Show all posts

Monday, April 11, 2011

Frayed Rose Quilt

This is a pretty quilt tutorial from Megan - from right here at This & That Creative.  I loov her quilt! :) Thanks Megan!!

Here is the blanket that I have had tucked away in my mind for a while
that needed to become a reality.
I wanted to do something I haven't done before,
and I had a few different ideas in mind. I was thinking I might want 
a scalloped design to quilt all over the blanket--similar to the scalloped 
design on the wall in this picture.
Image from HERE
My other idea was to use a flower outline--I ended up doing this one but 
would love to still try the scallops. I found an image online of an outline of a rose.
It is from a piece of jewelry, but just the design I wanted for my blanket.
Image from HERE 
I freehanded the design on my top selection of fabric for my blanket with chalk. 
As the chalk got smooth and didn't write as well, I'd rub it on
some sandpaper and keep going till I had the whole design on the blanket.
I had my top fabric, my batting, and my bottom layer of fabric already
laid out and matched up when I started my design.
I then measured each petal outline and wrote down those measurements.
Next, I cut some strips from some matching white cotton fabric to go over my outlines.
If my measurement from one petal section was 11", then I would make sure
to add a couple inches to it and make the strip to cover it about 13"or so, so that I could allow
for the curves where I knew the fabric would be folded a little. The
more the curves in the measurement, the more length I added to the strip.
It's best to always over estimate, so you don't have to cut a new strip. 
Here are all the strips laid out over top of my design.
I then pinned down the strips, folding in some spots like shown below to
help make the curves. Make sure to pin through your strip, top layer of fabric,
batting, as well as the bottom layer of fabric for your blanket and make sure
that all the layers match up correctly.
I missed a few spots and had to redo some parts.
Here's all of my strips pinned on. 
I then used my sewing machine to stitch my strips on.
 Just follow the center of each strip until you have the
whole design all quilted.
I used the simple binding technique that I found at My Spare Time , but 
instead of using a satin ribbon, I used some white fleece material that I had
pieced together and cut into a long strip.
After I had everything sewn, I threw my blanket in the washer and dryer.
I cut away any ugly looking strings as a result of the 
strips fraying in the wash and this is the result!
I love how it is super "fluffy" (Despicable Me--anyone?) and 
down-comforter-like that it turned out.
There really is no end to the possibilities that you can use for a design.
And I think next time I would like to try a ruffled edge around the blanket.
I'd love to see any more designs that anyone else tries!
Seriously... how much does this rock!?!

Monday, April 4, 2011

Blanket Tutorial - Crochet edge blanket

Remember when I shared this blanket I received? 
Isn't it pretty?   Here take a closer look.

Ok.  Where to start.  I love the colors.  I love the fabric.  I love the edges.  The edges...want to know how?  Here's Abbie to show you!


Several years ago my mother taught me how to crochet around the edges of flannel. When she came to visit me from Utah she brought along several burp cloths that had holes already punched near the edges that made it quick and easy to crochet. I live in Wisconsin and have not found any local way to acquire similar flannel blankets or burp cloths or anyone who has the machine and is able to do it for me. So I decided to try to come up with my own way of doing it. I also decided to try on calico fabric instead of flannel because for some things I like the look and feel of calico better. After some trial and error I found a way to put holes into the fabric that works well enough. One advantage to this method is that you don't see the holes in the final product, although the crocheting does go slightly slower. Here are the steps to make a blanket similar to this one:
1. Cut two pieces of fabric the size you would like the blanket to be, plus ½-inch extra.
2. With right sides together, sew around all four edges of your fabric with a ¼-inch seam allowance, leaving enough space to turn right-side out.
3. Turn right side out, hand stitch the opening closed and press the edges flat.
4. Using a wing needle and no thread in your machine, sew around all four edges with the longest stitch setting on your machine and slightly further than ¼-inch from the edge. A wing needle has metal flanges extending to the right and left of the needle. When the needle goes through the fabric, the wings push the yarns of the fabric to the sides, creating holes.
5. For the first round of crocheting, use a small crochet hook (about a size 8) to be able to get in and out of the little holes. Starting anywhere ch 1, sc in the same hole, and in each hole around. When you have finished all four edges, join the last sc with a slip st to the first sc.
6. Use a larger crochet hook, about a size 5, for the rest of your desired crocheting pattern. I used a copyrighted pattern called Vera's Shell Stitch so am not able to share it.


Thank you so much Abbie not only for the blanket for teaching me how to make one myself!!

Monday, March 28, 2011

Blanket Party

Gabe's Gifts
Hey guys!  It's the end of the month - which means blanket party time!   Don't forget each Monday you can see a special blanket tutorial at Today's Top 20, We're the Joneses, and This & That Creative

For anyone new - I've started a blanket drive this year to raise blankets for Project Linus.  Why?  To donate blankets in my son Gabe's name.  I lost our baby in August due to a miscarriage.  I really wanted something positive to be associated with his name.  And giving back is the best way to do that.

Project Linus is such a great organization.  They donate handmade blankets to kids (newborn - teens) who need them the most.  I'm really happy to be working with them.

I am so happy to say that I have recieved over 40 blankets for Project Linus.  WOW!  Thank you so much!!!  I really am just so greatful.  :)  Thank you thank you thank you.

The first round of blankets will be picked up this week.  It was spring break and my local chapter lady was out of town but I'll be sure to snap a picture! :)
There are 2 of the boxes over flowing...but ready to go!
I just love this blanket - so pretty.  Do you like the crochet edges?  Check next Monday for the tutorial! 
Thanks Heather!!

I had to unwrap the quilt!  All of those blankets were mailed together.  Thanks for the group effort ladies! :)

Lots of soft preemie blankets ....

Here is my little blanket.  I love the fabrics!  So happy!

Your turn!

  So link up any blanket project you've got.  Mail me your blankets to get donated.  Email if you are interested in guest posting a blanket tutorial (it will be seen at Today's Top 20, We're The Joneses and This & That Creative). 

Can't wait to see your projects!!
I'll pick one project using random to send out a little package of my favorite crafty things so make sure I'm able to get your email address! :)

And don't forget the 31st is the Blogger of the Month Party at Today's Top 20.  Come link up your fave. project you've made in March for a chance to win a great prize from My Vinyl Designer as well as a month's of advertising at Today's Top 20!


Monday, March 21, 2011

Ballerina Blanket Tutorial

One great thing about blogging is meeting new friends.  Stephanie from Full of Great Ideas is such a sweet gal and super creative.  You def. have to check out her blog!  I love it!  And I love this blanket she made.  It's so super sweet!  Thanks for sharing today Stephanie!! :)

My daughter was invited to her best friend's 8th birthday party. Her friend is an amazing ballerina and my daughter really wanted to make her a blanket with a ballerina on it. I knew there was no way I could make a ballerina but I came up with an idea that I am very proud of and I think is absolutely beautiful.

I used the same technique as my personalized fleece blankets to make this. I purchased the large deep pink coral fleece blanket (double bed size) and 1yard of tulle. I had black felt, pink fleece, pink ribbon, Velcro circles and thread in light pink, deep pink (to match the blanket) and black on hand. Total cost $5 for the blanket (on clearance) and $6 for the tulle.

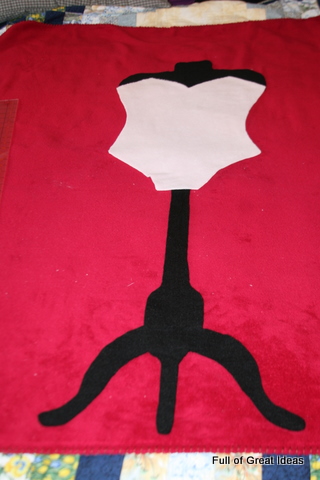
I started by printing off some images of a tutu and body form to be inspired from. I first cut out of black felt the bust of the body form, then the post and the feet. Make sure to prewash the felt because the color can transfer.
Once I was happy with the dress form, I used that as the shape to cut the bodysuit. I didn't want the top to be too low cut since this is a gift for an 8 year old girl so I made just a small 'v' shape. I used a wide light pink ribbon (same as the slippers) to make straps on the shoulder.

I decided to remove the black felt from behind the bodysuit so that it was quicker to sew. This is optional.
I placed all the pieces on the blanket to determine where I wanted the exactly. I then lightly glued the fabric down onto the blanket using a fabric glue that dries clear. I start with the black pieces first by pulling one side back and gluing it. This allows you to glue it down without having to move the entire piece.
 
Once this was drying, I started to work on the ballet slippers. For these I simply printed off a clip art image that was resized (approximately 7 1/2 long) to be in proportion to the bodysuit . I then cut out the shape of the slippers in light pink fleece and sewed a straight stitch over the inner lines to make it look like it had an opening for a foot.
 I ripped off the paper and did a tight zig-zag stitch over the straight stitch to create a bold accent line.
 
 
I cut two pieces of ribbon to the length I wanted to make the ties for the slippers (I lightly heated the ends of the ribbon so they would not fray). I glued the ribbons and slippers on the blanket.

I create the girl's name in a Word file using a font that I like. I print off the letters and then cut them out of the light pink fleece. I glue these down in the exact spot I wanted them.

Next I focused on the tutu. I had 1 yard of tulle so I folded it in half length wise and did a basting stitch along the fold.
Pulling one tread from either end I gathered the tulle until it was the width of the waist of the dress. I then sewed a ribbon across the basting stitch to secure it.
Once the glue was dry, I did a zig-zag stitch around the dress form, name and the bodysuit. I always use the exact color of the blanket for the bobbin thread and match the upper thread with what I am sewing. I find this makes both the front and back of the blanket look nice.
(Back of fabric with matching thread.)
I attached the tutu to the dress with small Velcro circles. I thought it would be best that this could be removed for washing. Not 100% necessary but a nice to have.
One last look. Wow... I can't tell you how happy I am with this. Let's hope she loves it too :)

Told you!  Love it huh?  A-stinking-dorable.

LinkWithin

Related Posts with Thumbnails