Showing posts with label holidays. Show all posts

Friday, October 7, 2011

DIY Christmas Stockings

What's that you say?  It's not Christmastime yet?  Well, at my house we prepare for the holidays virtually year-round because then, when November and December come, we can relax and enjoy the holiday season rather than become self-loathing hermits who refuse to go out in public because of the craziness.  My shopping is finished (just waiting to be wrapped), I'll be making candies soon, but the stockings I was able to do over the summer!  I digress.  

I wanted uber-cute-personalized-trendy-not-too-christmasy Christmas stockings. Pipe dream?  NO.  First, I had to find the right "shape."  See, we're big stocking-stuffing people and I needed it to be large enough to accommodate my visions of stuffing grandeur!  So I did what any great, creative mind would do...I went rummaging through my mom's holiday decor boxes to find my childhood stocking (which is large and sturdy enough to hold an orange in the toe, followed by an apple, banana, bottle of shampoo, and other trinkets-galore).  I set the stocking on my cutest-ever chocolate and white damask fabric and cut out my stocking shape.  Remember to cut two!
 Next step was to cut the lining for my stockings.  Again, remember to cut two!  I wanted my family's stockings to be all matchy-matchy, but still personalized.  Enter:  lining fabric!  I love red and brown together, and those just happen to be the colors my living room is already decorated with, so I chose different red fabrics which showcased both my personality and my husband's.  He got baseballs, I got hibiscus flowers.  One day, when we have babies, they will have different red linings.  But don't you worry that I've already cut out four more brown damask shapes in anxious anticipation!
 Furthermore, I wanted my stockings to be heavy-duty enough to take the wear-and-tear of the ceremonial stuffing-hanging-all-around-holiday-merriment, so between my damask and red lining, I also cut a piece of quilt batting.  I stacked my pieces accordingly to get ready for the sewing.
Because I was planning on binding the stockings with personalized bias tape, there was no reason to sew the pieces right-sides-together.  Easy, eh?  Therefore, I just serged the exterior fabric/batting/lining pieces together.  It was pretty slick and much quicker than having to turn them afterward.
Next came the bias tape adventure.  I had never made my own before, but it turned out to be MUCH easier than I expected!  I used the same lining fabric and created this tutorial (posted earlier) if you're interested.  If not, any ol' bias tape will do!

After attaching the front and back of the stockings together using the bias tape, it was time to work on the minky cuff!  That's right, minky.  See?  You know you love these stockings.  I used the heaviest interfacing I could find to put inside the minky.  Seriously, this stuff was like cardboard.  It wreaked havoc on numerous machine needles, but it definitely keeps the shape nicely!  I just measured the stocking opening, doubled its length (for the front and back), and then left a 1/2" seam allowance.  I cut the interfacing and then wrapped it in the minky.


 I serged the two ends together, and then inserted a hangy loop (extremely technical term).  Hint:  If you insert the loop the way I did, it make the stocking hang at a lovely angle.
Sew up the loop edge and pin the minkly closed (nice and tight) around the interfacing.

 Then, slide the cuff over the stocking opening and match pined edge to the opening.  Sew around the edge to attach the cuff to the stocking and...voila!...

 ...You have a broken needle...A LOT of broken needles actually!  I had to include this photo purely because I've broken plenty of needles in my day and have never seen one bend in such a fashion before snapping.  Amazing.
 Anyway, what you REALLY have (besides broken needles) are uber-cute-personalized-trendy-not-too-christmasy Christmas stockings.  I added some layers of grosgrain ribbon and little floral button embellishments.
 But wait!  There's more!  I also found these  silver monogram pins which made them even MORE personal!  I pretty much love how they turned out.  Now go make your own.  You know you want to.  Get it done before the holiday season so you can enjoy that time of year rather than stress it!
Note the cute, personalized bias tape?

Friday, February 25, 2011

Tie Dye Cake

 I picked this little skill up from a cousin of mine and I LOVE it.  How cute and creative are tie dye cupcakes/cakes?  You can easily personalize the colors for a party's theme, bridal colors, etc.
 I separated my prepared (and rather white) cake batter, then dyed it with food coloring.  I made this batch for a Valentine activity, but I have also done rainbow ones.  You could pick whatever colors you like.
 Just spoon the batter into your pan/cupcake wrappers.  It doesn't need to look pretty.
Once baked, they look like this!  I also took it to the next level and dyed my frosting.  Again, I just filled my piping bag spoonful by spoonful with the different icing colors.  As a tip--refrigerate your icing BEFORE filling your piping bag as well as AFTER so the colors don't blend themselves together too quickly.

Tuesday, January 25, 2011

Valentine Gift Box Printables

I used the blog backgrounds that I made earlier to make some Valentine gift box printables!

I've seen these before and found a free template for it at PaperCraft Art Creative. I used their idea but incorporated my backgrounds in my own template to make some that have Valentine patterns and a fun matching heart for the top.


Click on the valentine box template that you like, and it will enlarge. Click again to zoom in.
Then right click on the enlarged image to save and then use to print.


 To make your box, follow the instructions on this template that I found.


Today's Creative Blog


CreativeShareWednesdays


Tuesday, January 11, 2011

Super Quick, Super Easy, Super Cheap Valentine's Decorations

Here are a few Valentine's Day projects you can make.  Super quick.  And super cheap. 

First the banner.  It's hung on a pretty red string with little clothes pins ($2.39 @ Joann's).  I just painted each letter onto burlap.  I used the storybook cartridge on my Cricut. 
Total cost: less than $5.  With left over material


Next, the Styrofoam balls.  I actually got these at the Dollar Tree. The candy.  Dollar Tree.  One is covered in peppermint puffs (this was out at Christmas), one in red hots, and the other in candy conversation hearts.  Just hot glue those suckers on! Total cost $10 {For glue, candy and Styrofoam.  Plus some extra candy for more projects!}


I just copied the statue.  :) I got the letters at Hobby Lobby for 99 cents each.  Painted them red.  Used dabs of hot glue to stick them together.  Voila.  Total cost: $4

I grabbed a frame.  Stuck in some scrapbook paper.  Easy.  Total cost: FREE!

I just stuck some candles on the ends (I got at Hobby Lobby for 80% off - left over from Christmas.  But the first is a jar candle with layers of red and pink.  Looked Valentine's to me.  Paid $4.  The other is a pillar candle rolled in red glitter.  Nothing says Valentine's like glitter!  Paid $3.)

Tuesday, January 4, 2011

20 Crafts I'm doing for 2011....What about you?


Well, it's a new year!  2011.  I love New Years.  I do.  I love the goal setting.  The fresh starts.  The reflection and the looking forward.  So today I really wanted to share my top 20 things I want to make this year. 

1. I really would like to make a family history scrapbook.  A mix of family history and those books Tell Me your story.  Know what I'm talking about?  I thought about doing this a few years ago and it just got put on the back burner.  But no more! 

2.  Make a quilt.  Never done it.  But I will.

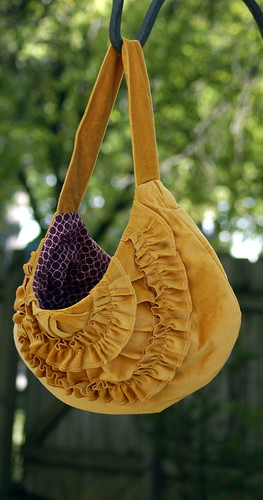
3. I want to make Emily's Grandview bag.  I've wanted to make it for a while now. 

4. I've got quite a few projects lined up for my living room.  I'm doing a vintage game theme.  But I can't share too much yet! :)

5.  I pledged to make 1 blanket a month for Gabe's gifts! {I would LOVE if you could help with this project!  Read about my story and how you can help here}

6. I would like to learn to make soap. 

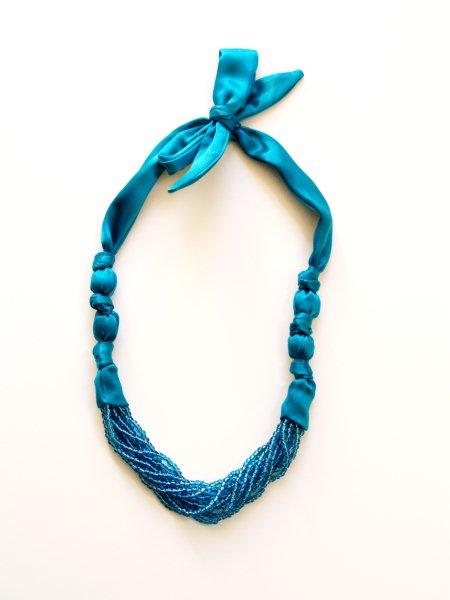
7. So I've given up trying to win one of these fabulous necklaces from Flamingo Toes.  {Darn all of the other 5,000 people who were hoping to win too!}  So I think I just need to make one myself.  Good thing she shows you how!  I've never made jewelry before so this is a first for me too.
8. And speaking of necklaces I still need one of the silhouette necklaces from All things made by Kelly.

9. DSCF1619
Josh lost his lunch money a few times this year.  So this is a must!! {A Lemon Squeezy Home tutorial}

10.  I think that there are a bazillion holiday things I saw this year that I didn't get to make so let me just generalize here: pillows

11. table runners/place mats/tablecloths

12. wreathes

13. buntings/banners...whichever you call them

14. and I obviously need a million frames for all of the holiday printables I've saved!!!

14.  Coasters.  I need coasters.  I don't have any.  Why? Must make some. 

15. Josh needs a new backpack.  I was going to order this Star Wars one from PB but they were sold out and on back order til Nov.  And then I forgot about it. 
I may still buy him one.  And make a 2nd backpack.  One that I like.  One to take to Grandmas.

16. My husband requested lounge pants like I made Josh.  Made me laugh.  But I will.  {And then he promptly asked me not to make matching family pjs}

17. Learn to make pretty cookies.  I'm so envious of all the pretty cookies out there!

18. And make cake pops.  Am I the only one who hasn't tried these yet? 

19. I'd also like to build something.  I've never built anything.  In fact.  I don't even really use a hammer.  {Seriously I don't.  If I want a picture hung up I lean it against the wall till I get Andy to hang it up.}

20. Greeting cards.  Kind of lame?  But I'd like to get a whole years worth of cards made.  And addressed.  And stamped.  And organized.  So I just have to pull em out.  How great would that be?
Whats on your list of crafty projects to try this year??


And on a non-craft related but New Years resolution related item of note... I was chosen to be on Win, Lose or Blog! It's totally exciting (and yet embarrassing that I've gotten all fat!) but I'd love all y'alls support over there! It starts Jan. 10. So if you've got a few lbs to lose come do it with me.  And we'll make it fun. Well, at least try! :)

Happy New Year everyone!!

LinkWithin

Related Posts with Thumbnails