Showing posts with label desserts. Show all posts

Friday, April 8, 2011

Boston Cream Pie Cupcakes

I thought of these babies while driving home from a meeting yesterday...You'll need:
  • 24 white cupcakes
  • 1 box instant vanilla pudding
  • chocolate frosting

 When your cupcakes have cooled, hollow them out (I use one of my Wilton tips).

 Prepare the instant vanilla pudding using HALF of the milk on the instant recipe (my box called for three cups, so I used 1 1/2 cups).  Let the pudding set in the fridge for about 15 minutes before filling the cupcakes.  Fill a pastry bag with the pudding and squeeze it into the hollowed out portion of the cupcake.  You can see I added just a bit on the top because...well...I really love pudding.

Top with your favorite chocolate frosting.  Gosh, these were yummy!  And easy.

Thursday, March 24, 2011

Burgers Anyone?

Grilling season is sneaking up on us, and what better
way to finish off a hamburger meal than with a
hamburger dessert!

Yup, this is a dessert
The buns are made out of vanilla cupcakes cut in half
1/2 a chocolate cupcake for the burger patty,
and red (ketchup) frosting,
yellow (mustard) frosting,
and green (lettuce) frosting.
The Fries are sugar cookies cut into strips and
dusted with sugar to look like salt!

Ready to be served!
When I served these at a cook out last year
our guests were very amused!
Oh, and I even found little red baskets at a local
restaurant store for about 50 cents a piece
to finish off the look!

Friday, February 25, 2011

Tie Dye Cake

 I picked this little skill up from a cousin of mine and I LOVE it.  How cute and creative are tie dye cupcakes/cakes?  You can easily personalize the colors for a party's theme, bridal colors, etc.
 I separated my prepared (and rather white) cake batter, then dyed it with food coloring.  I made this batch for a Valentine activity, but I have also done rainbow ones.  You could pick whatever colors you like.
 Just spoon the batter into your pan/cupcake wrappers.  It doesn't need to look pretty.
Once baked, they look like this!  I also took it to the next level and dyed my frosting.  Again, I just filled my piping bag spoonful by spoonful with the different icing colors.  As a tip--refrigerate your icing BEFORE filling your piping bag as well as AFTER so the colors don't blend themselves together too quickly.

Friday, February 18, 2011

Cake Mix Cookies

***EASIEST COOKIE RECIPE EVER!!! Kids can make them!***

1 box cake mix, any kind (use Devil's Food for Homemade Oreos)
2 eggs
1/3 c. oil

Preheat oven to 350*. Mix ingredients together with spatula/wooden spoon until thoroughly combined. Drop onto cookie sheet and bake for 7 minutes. Cookies will have soft centers, so leave them on the cookie sheet for a couple of minutes for carry-over cooking. These can be eaten as-is, frosted, or in "sandwich form" with frosting in between two cookies. For homemade Oreos, use Cream Cheese frosting.

Friday, February 11, 2011

Valentine's Day Meal Part II

Now for my very favorite salad in the whole wide world (seriously, we eat this almost weekly) and the chocolate covered strawberries!

BACON FETA SALAD
1 pkg. Spring Greens (or your favorite greens mixture)
1 carrot, diced
3 celery stalks, diced
1/2 seedless cucumber, sliced
1/4 red onion, sliced
handful of cherry/small heirloom tomatoes (you could dice a large tomato as well)
1/4 c. Craisins (dried cranberries)
chopped pecans/walnuts
4 oz. crumbled feta cheese (I use the basil tomato feta)
6 slices of bacon, cooked and crumbled (omit for veggie version)
croutons

Toss it all together and serve fresh!  I like to use a blueberry pomegranate or balsamic dressing, but just about any type of dressing would be delicious.  Obviously, you could omit any of the veggies you're not so fond of, or add some different ones if they're just sitting in your fridge.


Ingredients

  • 6 ounces semisweet chocolate, chopped
  • 3 ounces white chocolate, chopped
  • 1 pound strawberries with stems (about 20), washed and dried very well

Directions

Put the semisweet and white chocolates into 2 separate heatproof medium bowls. Fill 2 medium saucepans with a couple inches of water and bring to a simmer over medium heat. Turn off the heat; set the bowls of chocolate over the water to melt. Stir until smooth. (Alternatively, melt the chocolates in a microwave at half power, for 1 minute, stir and then heat for another minute or until melted.)
Once the chocolates are melted and smooth, remove from the heat. Line a sheet pan with parchment or waxed paper. Holding the strawberry by the stem, dip the fruit into the dark chocolate, lift and twist slightly, letting any excess chocolate fall back into the bowl. Set strawberries on the parchment paper. Repeat with the rest of the strawberries. Dip a fork in the white chocolate and drizzle the white chocolate over the dipped strawberries.
Set the strawberries aside until the chocolate sets, about 30 minutes.
I got my chocolate-covered strawberry image and recipe from HERE.  I won't lie.  I'm pretty stoked to eat dinner on Valentine's Day.

Friday, December 17, 2010

Gingerbread

Okay, so I've tried a few recipes for gingerbread, but I hadn't found one I really LOVED until now! I didn't post pictures because the blog I found the recipe on actually has far better ones than I could ever hope to recreate. They're delicious. I've been eating them all week!

Grandma Maude’s Soft Gingerbread Cookies

Ingredients:

  • 1c white sugar
  • 1c butter (shortening could be an alternative)
  • 1c molasses
  • 1 c sour cream
  • add 3t soda into vinegar just before adding to batter
  • 1 egg
  • 1T vinegar
  • 1t each of cinnamon, cloves, nutmeg, and ginger
  • ½ t salt
  • 4-5c flour

Instructions:

  1. Cream shortening and sugar
  2. Add molasses and egg, and continue to cream mixture
  3. Add milk, vinegar, spices, salt, and flour
  4. Refrigerate batter before rolling and cutting into shapes on a lightly floured board
  5. Roll on a lightly floured surface and cut into shapes
  6. Bake for 10 minutes at 350°F. If the cookies are really fat (thick) it may take 12 to 13 minutes. Keep an eye on the oven. They will not indent when you touch them when ready to come out.
  7. For big, fat gingerbread men, leave dough about ½ inch thick (much thinner for other cookies)
  8. Ice with Orange Butter Icing.

Orange Butter Icing Recipe

Ingredients:

  • 3c icing sugar
  • 1c soft butter
  • zest of one or two oranges
  • enough orange juice to mix into a fondant or play dough type consistency

Instructions:

  1. Mix all of the above ingredients until well combined and the consistency of fondant or play dough
  2. Chill for 15 minutes
  3. Roll some thinly onto parchment paper, and refrigerate again for 10 to 20 minutes
  4. Cut into the same shape as the cookie, lay onto the cookie (you may need to brush the cookie with a bit of sugar water for the icing to adhere – it will depend upon the temperature in the room)
  5. Decorate the layer of icing

Friday, November 19, 2010

Pumpkin Pie Guest Post

Even though it's Creative Freedom Week, with Thanksgiving approaching, I figured a yummy and slightly different take on Pumpkin Pie would be appropriate! This recipe started as a Paula Deen recipe, was tweaked a bit by my sister-in-law, and then was tweaked a bit more by me! It has definitely become my very favorite pumpkin pie (sorry, Mom!!).

However, I was asked by Sheena of The Best of Momma Chef to do a guest post this week as well! If you're interested in the recipe and directions (along with my homemade pumpkin pie spice recipe), head on over to her blog and indulge. :) If you're not convinced yet, here's a picture to entice you even more! And don't worry, I will be saving my pretty awesome "Creative Freedom" week post for next Friday (the 26th) because I felt it was super important for you to have this recipe BEFORE Thanksgiving rather than after. :)

Tuesday, November 16, 2010

Anthro Dessert Tower

A while back I spotted this little beauty at Anthro.
I also spotted it's price tag... 158 dollars!
So what did I do?
Made my own!
I got the teacups from the Pottery Barn and Williams Sonoma outlets,
the plates from HomeGoods,
and used Elmer's china and glass cement to put them together.
Grand total: less than 20 dollars!

It looks a little lonely sitting there by itself,
doesn't it?
there!
much better
the perfect size for mini cupcakes!
I have a feeling that my little one and I will be getting
a lot of use out of this in a few years when tea parties
become a daily occurrence.
what do you think?
good knock off?

Friday, November 12, 2010

Angel Pecan Pie

Okay, I know I've done lots of pie posts, but really, I just want you to be ready for Thanksgiving! ;) This recipe is an old family favorite. It's different than most pecan pies though; this one is very light--hence the "angel" in the title.What you need:

3 egg whites, beaten stiff
1 c. sugar
1/4 t. baking powder
1 t. vanilla
6 graham crackers, crushed into crumbs
1 c. chopped pecans

Preheat your oven to 350*, separate egg yolks from whites, and begin beating them!
***If you're making pies for Thanksgiving, SAVE THOSE YOLKS FOR NEXT WEEK'S RECIPE!***
When your egg whites look like the picture above (^), go ahead and fold in the rest of the ingredients with a rubber spatula or wooden spoon. Incidentally, if you have kiddos who love to help cook, let them smash the graham crackers in a Zip-lock bag while the egg whites stiffen. They can use their fingers or even roll a rolling pin/soup can over the bag a few times. When adding in the ingredients, the fluffy egg whites will "fall," but don't worry! They're supposed to.
Pour contents into a pie tin (an 8-9 inch works best) and bake for 25 minutes.
Allow pie to cool completely (I usually make this pie the night before I need it just because I can!). Just before serving, top with whipping cream (the real stuff works best).

Friday, October 22, 2010

Peanut Butter Truffle Brownies

These are sinfully delicious and you won't regret making them! Also, they're so stinkin' simple.
1 box brownie mix (9x13 pan size)-follow box directions

FILLING:
1/2 c. butter, softened
1/2 c. peanut butter (creamy or chunky both work fine)
2 -3 c. powdered sugar
2 t. milk
TOPPING:
1 c. chocolate chips
1/4 c. butter

Cook brownies per box directions; cool. Beat filling mixture and spread over brownies. Microwave topping; stir until smooth. Cool for about ten minutes and then spread over the top. Refrigerate before serving.

Friday, October 8, 2010

Dutch Apple Pie

What can I say? Autumn puts me in a pie mood!Preheat the oven to 425*

Use the same crust recipe from last week. I like to flute the edges all pretty, but you can edge it however you'd like.Just be sure to poke the dough in various places with a fork to allow for some ventilation.
Place your cut apple pieces in a large bowl with 1/2 teaspoon of cinnamon, nutmeg, allspice, and a dash of cloves. Stir it around and then add 2/3 c. of sugar. Mix thoroughly and place in pie crust. Reduce the oven temperature to 375* and bake for 10 minutes.
While the pie is in the oven, make the streusel topping by combining 1/2 c. brown sugar, 2 T. butter, and 3/4 c. oatmeal. **Big fat secret** I use the cinnamon spice pre-packaged stuff for added flavor (I usually make a smidge more of this because I find it delicious).

Remove the pie from the oven and sprinkle the streusel topping over the apples. Return the pie to the oven to continue baking for an additional 30 minutes. If the streusel or crust are getting too brown, you can cover the pie lightly with aluminum foil.

Friday, October 1, 2010

Chilled Fruit Pie

These are the easiest pies ever (well, maybe except for a pudding pie) and super tasty!

Crust:
1 1/4 c. flour
1/2 t. salt
1/3 c. shortening
3-5 T. cold water

Combine the first three ingredients and slowly add the water to desired consistency. I love a flaky pie crust so for me, less is better! Once combined, roll flat and place in a pie tin. Using a fork, poke around the edges and bottom of the tin to allow for steam so you don't get bubbles. Bake the crust at 450* for 10-12 minutes and allow it to cool.

Gel Filling:
2/3 c. sugar
1 T. corn starch
1/8 t. salt
1/2 c. water

While crust is baking, combine the filling ingredients in a sauce pan and heat over medium to medium-high heat until the gel has boiled for one minute. Stir enough to keep it from burning to the bottom, but don't over stir (if that makes sense). Allow gel to cool and place in the fridge to chill.

Sliced fruit options:
peach, strawberry, nectarine, a combo of any of the aforementioned...you choose because they're all delicious!

When gel has chilled, place sliced fruit in cooked pie crust and poor the gel over the fruit. No stirring necessary. Top with whipping cream and serve immediately!
...Note the cream-to-pie ratio...this is merely a suggestion!

Linked up with:

Friday, September 17, 2010

Berry Cream Puff Sandwiches

Photobucket

This recipe comes from a tweaked version of Patsy Swendson's "Chocolate-Raspberry Cream Puffs with Praline Powder" in the Texas The Beautiful Cookbook that I received as a gift when I was living in Texas.
Now I'm not gonna lie, this was the first time I actually made cream puffs. I have always wanted to make cream puffs, but always felt intimidated. I guess because most of the time I ate them at wedding receptions, and that's just pretty fancy. I was definitely pleased when it didn't take much at all to make them!

Here is the recipe:
Berry Cream Puff Sandwiches

For the cream puffs:
1 cup of water
1/2 cup of butter
1 cup of all-purpose (plain) flour
4 eggs

For the berry cream (my variation):
6 oz. of a berry flavored yogurt
8 oz. cream cheese
1/2 cup of powdered sugar
optional: one 3 oz. package of berry flavored jello

To complete the recipe:
1-2 cups of any type of berries 

  • To make the berry cream, combine yogurt, cream cheese, and jello and mix until smooth. Add the powdered sugar slowly while mixing. When your cream is a smooth consistency, refrigerate while you make the cream puffs.
  • Preheat oven to 400 degrees F.
  • To make cream puffs, in a saucepan over low heat, combine the water and the butter. Bring to a boil and remove from the heat. Add the flour all at once and stir vigorously until the mixture forms a ball and leaves a film on the sides of the pan. 
Photobucket
  • Allow to cool slightly, 3-4 minutes. Add the eggs, one at a time, beating well after each addition. 
Photobucket
  • To form each cream puff, drop 2 rounded tablespoonfuls of dough onto an ungreased baking sheet, forming little mounds that are about 2 inches apart.
  • Bake until puffed and golden, 30-40 minutes. Let cool completely on the baking sheet. 
Photobucket
  • To assemble the cream puffs, slice the cream puffs in half horizontally. Fill the bottom pieces with the cream. I had a little problem with the bottoms having holes in them, so maybe have them on the plate you want them on before you add the cream, so you don't have to move them and have to deal with the cream falling out in the process. Then add the berries on the top of your cream, add another layer of cream on top of the berries, and put the tops of the puffs back on. Garnish with a berry. 
  • Makes about 12 servings.
Photobucket

I am not lying when I say that I ate seven of these little beauties in one day. My husband couldn't stop me. Enjoy! Maybe not seven in one day though... 

Friday, September 3, 2010

Brigadeiros: Brazilian Candy

Welcome to Creative Culinary Day at This & That Creative. To start us off, I have chosen a recipe that I love! 
Brigadeiros

This recipe is very simple, but very yummy (and gluten-free, depending on what you roll them in)! It is a Brazilian Candy that is often served at birthday parties.

My family met Virginia (from Brazil) and her family through my uncle. This family visited the states a few times while I was growing up and would make sure to stop by at our house. Virginia shared this recipe with us, and everyone would always love when my mom would make them! 

Brigadeiros are named after Brigadeir Eduardo Gomes (a famous Air Force Brigadeir in Brazil) and originated in Brazil at a time when nuts, fruits, and imported sweets were scarce because of the war in the 1940s. Nestle had just introduced cocoa powder and sweetened condensed milk. The combination of timing and access to ingredients gave birth to Brigadeiros! And I am oh so glad!

Here is the original recipe as told to my family:

Brigadeiros

1 can (14 oz.) of sweetened condensed milk
2-4 tablespoons of butter
1/4 cup of cocoa powder
Sprinkles or anything else yummy to roll them in

Prepare a plate to pour your mixture on by rubbing 
butter across the surface and set it aside.
Mix ingredients together in a pan over medium heat.
Stir continuously while mixture thickens (about 10 minutes).
When you can tip the pan and the mixture pulls away from
the edge as though it is loose from the pan, 
you are okay to take the pan off the heat. The longer you
cook them, the thicker they will be. If they are already
pulling off the pan, I would leave them on the heat only about
 two minutes longer if you want them thicker. Do NOT overcook.
Pour the mixture onto the buttered plate and then refrigerate
until cool enough to handle. The cooler they are, the 
easier they are to handle. Next you will need to wash 
and butter up your hands. Take a spoon and scoop the mixture
off the plate to roll into balls, and dip each ball 
into any of these: sprinkles, coconut, crushed Oreos, 
crushed graham crackers, nuts, etc. 
Place the balls in small candy cups (mine usually don't
make it to this point..hehe). You can serve them right away or chill 
them until you want to eat them!

P.S. I hear that these can be made without the cocoa powder for a more caramel taste but have never tried it. Leave a comment if you have tried it this way, or if you decide to make them from this recipe, I'd love to hear how they turn out! 

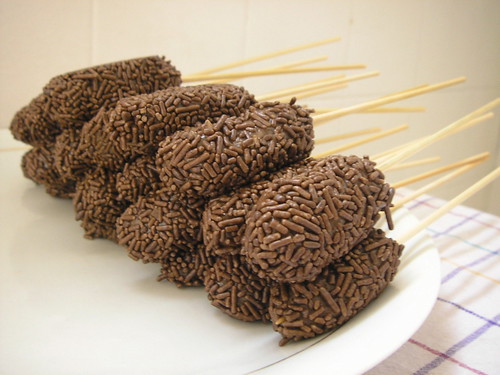
Here are some other ideas of how to serve them:

with spoons in a cup
Photobucket

on a stick

with a surprise inside

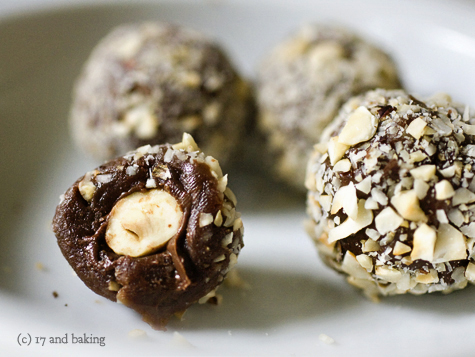
17 and Baking has some great variations. Check the page out HERE.

LinkWithin

Related Posts with Thumbnails