Friday, March 18, 2011

Fabric-Twisted Rosette Tutorial


I love accessories.  I love accessories which can be switched out with ease even more!  I bought a package of plain headbands at Kohl's a few weeks ago and decided to spruce them up with some fabric flowers.  Except I didn't want them spruced up permanently (sometimes I like to be a bit plain-jane).


Take a strip of fabric about 12" long and 2" wide (obviously you can play with these not-so-precise measurements to make the rosette more to your liking).

 Fold the strip in half the long way with the wrong sides together.

Begin rolling the fabric around itself at one end.  Once a small "rosette center" has formed, begin twisting the tail of the fabric as tightly as you can.

Wrap the twisted tail of fabric carefully around the rosette center you made previously.  Note:  The fabric should be even with the rosette center on the top.  The bottom of the rosette center you rolled will hang out the back a bit unevenly.


If the rosette gets too large for you to handle (or your fingers cramp up like mine) just guide a strait pin through the twists to the center to hold it in place while you continue.

 **See the rosette center hanging out the back?**  
To put a clean finish on the back of your rosette (and to hide the rosette center piece) just leave part of the tail untwisted and hot glue it to the rosette's back side.  There are two options here:  You can cut the fabric to size after it's been glued (like I did with the pink flower), or you can leave the tail hanging off to look like a leaf (which is how I did the tan one in the first photo).

 Then, hot glue a little loop, just large enough for your headband to slide through (that way, you can wear it on whichever headband you choose!).  It could also be slipped through a pin and worn as a broach, on a chain, or string of pearls/beads.

 ...And since my husband is a jeweler/gemologist, we have hoards of stones around the house.  I stole three to embellish the center!  This is also a great craft for a girl's birthday party/church activity as it requires minimal sewing/crafting skills.  Plus, it's also a great way to get rid of the fabric scraps you've got just hangin' around!

Thursday, March 17, 2011

Learning to Sew Zippers

I have made MANY pillow covers over the
past few years. For myself, friends, design clients,
and for my shop on Etsy.
I just recently decided I wanted to learn how to
sew zippers into my pillow covers rather than
doing an "envelope closure."
All it took was a trip over to YouTube to find out how.

I watched this VIDEO
and found the zipper foot that came with my
sewing machine, and that's it!
A few practice zippers later, I now know how
to sew in a zipper.
And guess what...
It's easy!
Here is one of my finished pillow covers:
and the zipper closure:
If there is anything out there you have been wanting
to learn more about check out YouTube or other
blogs or tutorials. It's so much easier
than teaching yourself!

And check out my Etsy shop if your in the
market for new pillow covers!

Wednesday, March 16, 2011

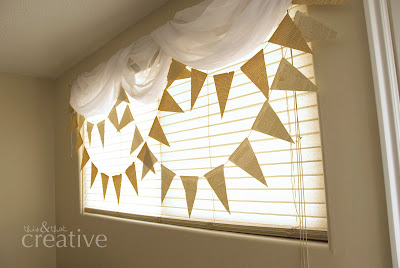
Window Bunting

We have been in our house since 2009 and I still have yet to complete our 
master bedroom decor. I'm slowly making progress. Here's my latest.

My husband and I got a quilt for our wedding that is a tradition with all the cousins on my mom's side of the family. The bride and groom pick the colors, my aunt in Alaska usually pieces the quilt together and then during the next reunion, everyone contributes with some hand stitching. The pattern is the same every time, but each quilt is unique to the couple because of the different fabrics. Mine and Gary's was the 21st quilt made. We chose the colors brown and blue. It didn't turn out exactly as I had imagined--I was thinking of more of a sky blue. For a while I wanted to switch up the bedding altogether. But now it has definitely grown on me--it has so much meaning in it. I have just been struggling how to make the rest of our room tie into it.

Well, we have this window in our master bedroom that was just a window for a while. Then we found some brand new blinds at a yard sale for $10 (steal!). The door right next to the window that goes outside already had a shear white curtain over it, so I got another sheer white curtain to add to the window. Then it sat there. For a long time... Nothing too interesting or awesome about it.

I have these old books that I got at a flea market when I was in New Mexico. I've just held onto them for some random future project. The colors of the aged pages matched the quilt! So I decided to make some bunting for the window. Seriously, it hardly took any time at all. 

I cut the pages into triangles,
hot glued them onto some yarn about 1 1/2" apart, and hung them up!
I used a wire where the arrow indicates and bent it 
around the rod, and hung it down so I could hang
the bunting on it without going all the way to the top. 
I did the first string from a book with lighter pages.

The next string of bunting came from a book with darker pages.
I hung it just the opposite from the first string.

I love that some of the pages had some handwritten notes on them.


Now to fix the lamps...

Linked up with:

Tuesday, March 15, 2011

DIY Cake Fondant

Last week I went to a dinner celebration for Relief Society at church. I got to decorate eight cakes for the centerpieces of the tables. EIGHT. (With a little help from my friend Angie, who wanted to learn how to make fondant.) 

Well, I don't have eight cake pans. So some wonderful other gals from church helped me out by baking a few. We used white cake batter and mixed Nerds into the cake batter to confetti it up a little, which tastes great too!

Thank goodness for this DIY fondant. It made everything go a lot faster and look a lot better. And it doesn't taste like the store bought fondant. It is better. This recipe is actually quite easy to do and only has 3 ingredients:
  • One 16 oz. bag of mini marshmallows (mine has been 12 oz. and still worked)
  • 2 TBS of water
  • One 2 lb. bag of powdered sugar
Here is the how to:

Frost your cake with a layer of regular frosting. This is so that your fondant will stick, as well as give it a soft "pillow" for your fondant so it will look more smooth. The smoother, the better.
Take a microwave-safe bowl and put the whole bag of marshmallows in it. I use a large glass bowl. Pour the 2 Tbs. of water over top of the marshmallows. Put the bowl in the microwave for 30 seconds, stir, and repeat about four or five times until total cook time is about 2 or 2 1/2 minutes. When the marshmallows look smooth, dump pour (let's be a little more graceful) about 3/4 of the bag of powdered sugar into the bowl and stir. When it starts to thicken, grease up your hands real good with crisco/shortening and knead it into a ball. Take the ball out and lay it on a surfaced that has been covered with shortening. You can add water or powdered sugar to get your desired consistency. Now you can roll it out, add food coloring, and use cookie cutters, etc. to get the look that you want. It's almost just like playing with Playdough again. Ah, the good old days.
  I rolled my fondant out into a big circle, making sure that it would cover my cake.

 I used a pizza cutter to cut off the excess fondant.


You can totally get inspiration from other cakes too!
For a luau party, we Google image searched a surf board cake and found this:
The Party Dress
So we made this:

Well, I totally forgot to take pictures of all of the cakes we made before some people came to pick them up and take them to the dinner. When I finally arrived, I was only able to snag pictures of four of them!


There are a number of websites that have a similar recipe--if you want some tips on storing your fondant or getting rid of bubbles etc. here are a few good ones to visit:

Friday, March 11, 2011

Photo Montage Wall Art

Nearly a decade ago, I was watching an episode of Trading Spaces where one of the designers used various floral photographs to create a photo montage on a wall.  I loved it.  That's just all there was to it!  I had to have one.  Years later, I took these hibiscus pictures while my husband and I were on our honeymoon in the Bahamas.  I printed and framed them shortly after we returned home and they have added a pop of color to our chocolate brown accent bedroom wall for the last four years.  

Even though I still totally love the hibiscus flowers, I felt it was time for something a bit different more gender-neutral.  I came up with this:


My husband and I LOVE to travel.  I take loads of pictures constantly, so I had many to choose from!  I finally decided on a montage of some of my favorite trips (admittedly, some were without my husband).  I will be the first to admit that I did have to apply some "master PhotoShop skills" as I didn't particularly enjoy the random strangers who also appeared in my pictures (minus the Times Square photo--NYC just isn't the same without loads of people...and taxis).  But hey, you'd never know that my Golden Gate Bridge shot and Bahamas Beach shot were previously littered with unnamed strangers!  I printed these with a sepia tone because, even though the pictures are more beautiful in color, I didn't want the wall to be TOO busy.  I love how it turned out!

LinkWithin

Related Posts with Thumbnails