


It's always fun to have a unique or custom background for your blog!
Here is how you can use any image you want as your blog background by using the Template Designer provided by blogger. You don't have to search and change any HTML to do this--you will just copy and paste the code I will give you where directed. If you digital scrapbook, or like to mess around with photo editing software, it's always fun to use an image that you made especially for your blog. But if you just want to go with a fun pattern you found, that works too! HERE is a great place to find some pattern images to use for free!
1. Select an image you want to use as your background. This image can be from the web or from your computer. It's best to save the image to your computer first before using it--just because you never know when the image will not be hosted in the same location anymore. But if you are not so worried about that, you can just use the original URL where you found your image, which can be used as the URL OF YOUR IMAGE.
You can choose a repeating pattern that is a smaller image like this:

300 pixels x 300 pixels
(shown actual size)
If you choose an image like this, make sure the design is the size you want, and understand that this design will repeat itself all over your background. I used this method for our Christmas blog design.

Or you can choose a larger image with borders that fit your blog, like this:

1450 pixels by 1100 pixels
(click on image and zoom in to see actual size)
2. Upload your image to an image hosting site and get its URL (a.k.a. Direct Link).
If you are using a smaller image that will repeat itself, you can go ahead and upload your image to Photobucket or any other online image hosting site. BUT Photobucket only allows your images to be saved up to a certain size, so if you are doing a larger image with a border to fit your posts, sometimes Photobucket will actually host the image smaller than you want. I was only able to get the larger image that I have used as an example on this post to save in Photobucket as 1023 pixels by 776 pixels, when the actual image size is 1450 pixels x 1100 pixels. This can result in the background not aligning like you want. Because of this, HERE are some instructions on how to use blogger/blogspot to host your image at its original size.

3. Once you have the URL OF YOUR IMAGE, you will go to your Template Designer. This is found under your Design tab. If you don't see the Template Designer, you need to upgrade your blog. See the end of this post HERE to find out how to update it.
Once your image is hosted, make sure to get the URL OF YOUR IMAGE. In Photobucket, once you upload your image, you can select and copy the DIRECT LINK, which is the same thing as the URL OF YOUR IMAGE.
3. Once you have the URL OF YOUR IMAGE, you will go to your Template Designer. This is found under your Design tab. If you don't see the Template Designer, you need to upgrade your blog. See the end of this post HERE to find out how to update it.


When you click on Add CSS, there will be an empty white box to the right of it that you can enter text in.

Just copy and paste this code into the Add CSS box provided.
Make sure to insert the URL OF YOUR IMAGE within the code where indicated.
You can go ahead and jump to step 4 if you like what you see.
If you are using a larger image, you will want to use this code:

Copy and paste this code into the Add CSS box provided, making sure
to insert the URL OF YOUR IMAGE where indicated.
to insert the URL OF YOUR IMAGE where indicated.
I have this code set to my preferences, but you may want some things
different in your own background image.
This is why I color coded some of the words in the code preview.
Here are some things you can change if you would like:
no-repeat:
This word can be changed to "repeat", and your image will repeat itself
fixed:
This can be changed to "scroll" and your background
will move with your blog page when you scroll down your blog.
center:
This can be changed to "top" or "bottom". This indicates the vertical
position of your image.
center:
This can be changed to "left" or "right". This indicates the horizontal
position of your image.
If things are still not aligning like you want, you can also adjust the width of your blog to help your background fit a little better. You can do this in your Template Designer under Layout, then click on Adjust width.

Once you like what you see, save the these settings to your blog by clicking on Apply to Blog in the upper right corner of your screen.
There you go! Have fun with your own new background! If you have any questions, just let me know!
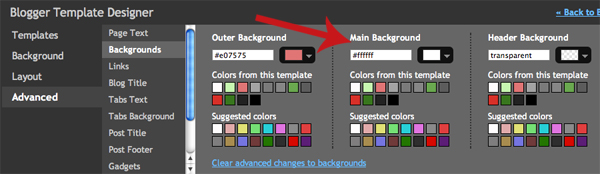
Oh...I forgot to add, if your pattern shows up even behind all your posts and sidebar, you can fix that by changing the color behind your posts and sidebar area. Just go to Advanced under your Template Designer, then Backgrounds. The Main Background can be changed to a plain color so the pattern does not make your posts and sidebar items hard to read.
I LOVE that you post about stuff like this. I really am new at the blog thing and your last post about how to link really helped me. Thank you so much!
ReplyDeleteI am so glad to help!
ReplyDeleteI love how you have posted this tutorial on your blog. I intend on coming back in a day or two to give this a try! Thanks...Sue
ReplyDeleteThank you very much for sharing this tutorial. It was easy peasy and I am getting to a more what I want my blog to look like look =)
ReplyDeletegolden goose sneakers
ReplyDeletebalenciaga sneakers
kobe shoes
nike basketball shoes
yeezys
fila
nmd
cheap jordans
christian louboutin outlet
nfl jerseys
Way cool! Some very valid points! I appreciate you penning this post
ReplyDeleteand also the rest of the site is extremely good. joker388 slot online
Its really useful website. I appreciate your post.We are an ECOMMERCE PRODUCT PHOTO EDITING Company. Recently we have post an article about add brushes to photoshop and Car Image Background Replacement. Please check out. Thanks
ReplyDeleteGratefull for sharing this
ReplyDelete