


Since my faithful brown flats from last year finally died (and I really tried to prolong the process as you can see), I have been on the hunt for some new brown flats. I'm not the kind of person that spends money on shoes I don't love, and I have yet to find some that I love. So recently the thought occurred to me: What if I made some out of my old ones? I can blame this thinking on my husband who got me a new sewing machine for my birthday, and now I've been wanting to sew everything lately. I have my own little sweat shop in the making. But who makes their own shoes? I did!
Here are my old shoes:


You will need:
old flats
hot glue or Gorilla Glue/Shoe Glue
1/4 yard of fabric or less for inside of shoes
1/4 yard of fabric or less for outside of shoes
thread and sewing machine
1. First I decided to tear my shoes apart. It was interesting. I never saw the inside of my shoes before. I'm pretty sure they are not meant to be torn apart. The glue they use is amazing. I really had to get some muscle into tearing the soles off.
The pieces I ended up with were 2 soles, 2 paddings, and the 2 outer coverings. I put the soles away for later.
2. Next I used my pieces as a pattern to cut out my new fabric. If you want to, you can find some new padding to replace the old padding--just make sure to make them the same size. You can use a thin foam that would work well. I didn't and probably should have, but my little boy was napping and I was anxious to get my project going.
I wanted the shoes to be brown, so I found some brown fabric (felt actually, which I probably won't use next time around, but it was the only brown fabric I had on hand) to use for the outside. Choose a fabric that has a similar stretch to the old fabric. I allowed for about a 5/8" seam allowance. You will want to cut out two more pieces just like these out of the fabric you want to be in the inside.
I chose a dotted fabric that matched the brown fabric to cover the inside. Make a pattern from your padding too, allowing for the 5/8" seam.
Here are the pieces you should have--I am lettering them so its easier to follow instructions.
3. Now you will start the sewing. Turn the ends of your A pieces together so the front sides of your fabric are facing each other. You will do this to your B pieces as well. Sew the ends together, allowing for the seam.
My shoes had a little strip on the back of the heel that I cut through when I cut apart my shoes, and I decided to add a strip on the brown piece for the new shoes too. I just sewed it on after turning it right side out. You don't have to do this.
Now take both an A piece and a B piece and put them together front sides facing each other like this. You will do these steps twice, once for each shoe.
Sew around what would be the top part, connecting both piece A and B together.
Flip the pieces so that the right side faces out. You may need to iron them to make more of a definition between the inside of the shoe and outside. We'll call these new combined A and B pieces the Shoe piece.
In the picture above, you can see that I then sewed around what would be the bottom part of the shoe, this time the front sides are NOT facing each other. You actually don't have to do this, if you don't want to worry about making sure this stitching does not show when you put your sole on your shoe.
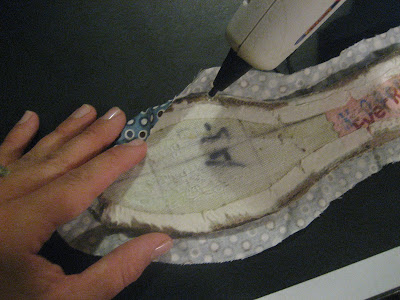
4. Now you will start gluing. I used hot glue, but you may want to use that Gorilla glue or Shoe Goo (I think that is what they are called), but you will have to allow time for that glue to dry.
First you will glue the cover (piece C) on your padding. Take the C pieces and glue them around their coordinating left and right pieces of padding like so.
Then you will take your new Shoe piece and match it up to the padding. Overlap and glue the inside fabric on, and then the outside fabric, gluing right over where you glued earlier. I used my stitching as a guide, but if you didn't stitch around the bottom, glue as if you had a 5/8" seam to glue on. You may have to scrunch some fabric here and there to make it fit. Do most of your scrunching at the heel or the toe.
Now your shoes should really be starting to form!
Now you just have to glue the soles on.
If you want, you can add a little embellishment to your new shoes. I cut out two strips of felt for each shoe and bunched them into ruffles, then hand sewed them on.
For never making shoes before, I was pretty pleased with the end result! And honestly, I spent nothing on them because everything I used I had in my house!
My husband came home and was in total shock that I made my own shoes. Really, he was mind-boggled that anyone would even think of that. I even heard him mention that he wants to make his own shoes :)
Linked up with:

Okay, that is amazing! I would never be able to take on such a task...and they are down right cute!
ReplyDeleteI adore these. I've got a new blog and this was featured today! I'd love if you stopped by and grabbed a button!
ReplyDeletetodaystoptwenty.blogspot.com
i am impressed
ReplyDeleteHow well did the glue hold up to wearing the shoes?
ReplyDeleteThey've definitely held up so far! I think because the felt glued well. I'm thinking that if it was another kind of fabric, it might need some different glue. But I bet Gorilla Epoxy Glue would work well, and it dries in 5 minutes. I would just clamp the soles on, or put something heavy on the shoe to hold the soles in place while it dried :)
ReplyDeleteabsolutely amazing! I would never in a million years, look at my old ballet slipper shoes and think...I can re-make these! Kudos! Adorable!
ReplyDeleteThat is really crazy, I can't believe how great they look! You Rock!!!
ReplyDeleteReally decent post I simply unearthed your weblog and wished to say that I have genuinely delighted in searching your weblog posts. Much obliged man.
ReplyDeleteVery nice I accept as true with your thoughts. Many thanks a great deal I’ve benefited therefore usually I’ll visit your website.
ReplyDeleteWow! You did it well. Job well done. Thank you for sharing this interesting blog of you. I will definitely share this to my friends. :)
ReplyDeletehttp://www.boex.tv/
oakley sunglasses wholesale
ReplyDeleteferragamo shoes
iphone case uk
uggs outlet
abercrombie and fitch
tory burch outlet
adidas nmd
mont blanc pens
cheap canada goose jackets
adidas wings shoes
rolex uk
ugg boots
michael kors outlet
moncler jackets
michael kors outlet online
ralph lauren polo
michael kors outlet
michael kors handbags
mulberry uk
coach outlet
michael kors wallet sale
longchamp handbags
louis vuitton outlet
longchamp pliage
ugg boots
rolex watches
fitflop clearance
michael kors outlet clearance
michael kors factory outlet
reebok trainers
mulberry outlet
lebron shoes
michael kors outlet online
ugg boots
pandora outlet
20160827caihuali
20180519xiaoke
ReplyDeletemichael kors outlet clearance
air jordan shoes
minnetonka outlet
salomon shoes
reebok trainers
james harden shoes
ralph lauren pas cher
oakley sunglasses wholesale
ray ban sunglasses outlet
true religion outlet uk
20180621 junda
ReplyDeletecanada goose jackets
ugg boots
van cleef & arpels jewelry
nike store
raptors jerseys
fitflops shoes
spurs jerseys
uggs outlet
ugg outlet
merrell shoes
adidas stan smith men
ReplyDeleteyeezy boost
adidas nmd r1
off white jordan 1
paul george shoes
yeezy boost 350 v2
converse outlet
michael kors outlet
yeezy
hermes
This however is hardly a reason New Jordan Shoes 2020 to permit further loss of life. A way around the problem New Yeezys 2020 has to be found. Alarmingly, while in the 1990s up to 70 fire Coach Bags Outlet engines were available to tackle fire emergencies in the country most heavily populated city, MK Outlet this number has now dwindled to 12.
ReplyDeleteYou see, acne is something that cannot be helped by those Coach Bags Clearance who are mannered. It is because of their specialized genetics, and when they Coach Outlet Clearance range a in no doubt age, their hormones go dotty and material possession specified as acne inception to turn up. So disease of the skin treatments such as as Acnezine are used to do away with their Michael Kors Outlet Store acne, with interest until that Nike Air Force 1 Cheap Outlet time scarring occurs..
Surgery to cure obesity should be undertaken as the last resort for people who are very obese, have tried all the other options available and have medical problems. The main surgical option is to have your stomach banded or stapled so that it cannot accommodate more food. Cheap Ray Ban Glasses Why not eat less voluntarily?.