


I photographed this picture of the St. George, Utah Temple and wanted to frame it and put it up in my home. I actually ended up helping out with a church project where the women from church got together and made these, but with 8x10 prints of this same picture I took. They all turned out amazing, and I've had a ton of more requests for the pictures and how-to!
So here is the DIY Picture Project how-to!

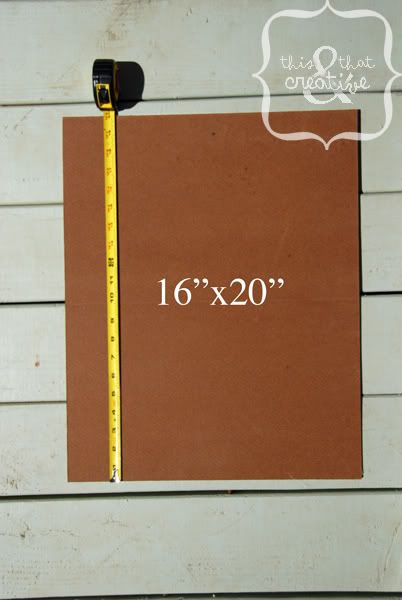
For a 16x20 print, you will need:
spray adhesive
a ten foot baseboard (for the frame)
wood glue
clamps or something heavy (to hold your frame in place while drying)
turn button hardware, good tape or a staple gun (to keep your picture in the frame)
sand paper
acrylic or spray paint (the color you want your frame)
16"x20" masonite board
paint roller
Mod Podge
16x20 print of the picture you want to use
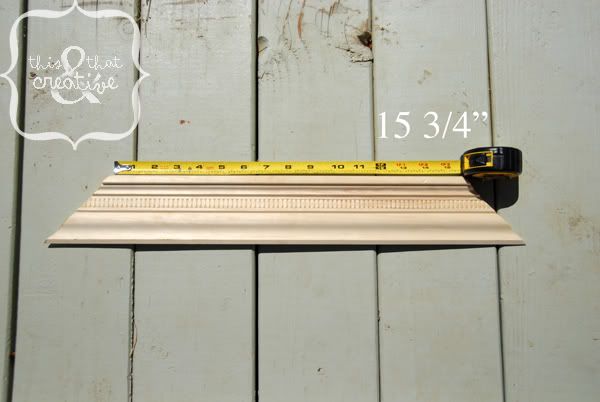
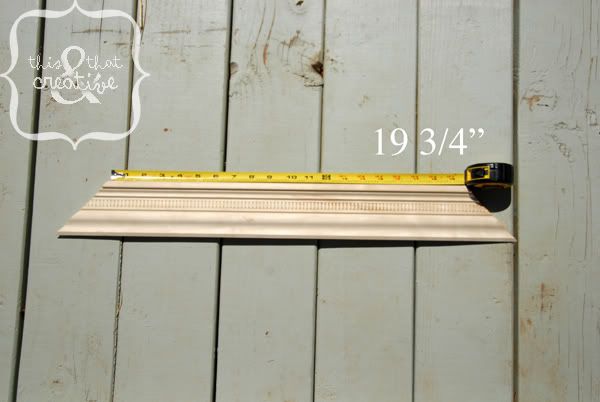
When you have all the items, you will want to start with the frame. My husband so kindly did this part for me with his band saw. You can also get your baseboard cut at Lowes or Home Depot for a small fee or free if you don't have your own tools for it. You will make your cuts at a 90 degree angle so that the edges will match up. Make sure to cut two pieces so that the inside measures 15 3/4" in length, and two pieces where the inside measures 19 3/4" in length.
Cut out two pieces like this:
Cut out two pieces like this:


Router the back inside edge of each piece 1/4" in. This gives your picture a nice fit inside your frame. If you don't want to router the inside edges, you can still make it work, you just have to attached the picture differently, which I'll explain how to later on in the tutorial.
This picture shows a long and short side piece of the frame. You will router all four pieces.

Now glue your frame together with wood glue. Clamp it in place on a flat surface or set something heavy on it while it dries.

Take your 16"x20" masonite board and get ready to attach your print to it.
You will spray the board evenly on the smooth side with the spray adhesive. Match the corner of the print to the corner of the masonite board and smooth your print over it. Use a popsicle stick or something similar to smooth out any bubbles. Be careful not to push too hard and scratch your print.

You will spray the board evenly on the smooth side with the spray adhesive. Match the corner of the print to the corner of the masonite board and smooth your print over it. Use a popsicle stick or something similar to smooth out any bubbles. Be careful not to push too hard and scratch your print.

When your print is secure on the masonite board, you will then need to create the "canvas finish" on your print. This finish makes all the difference! It really will look like you bought this as a special finished print.
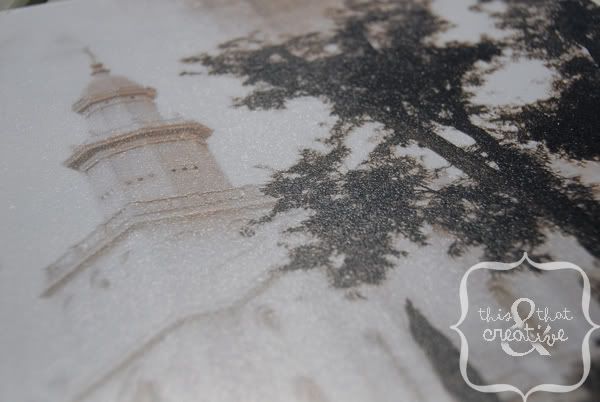
Take the Mod Podge and pour some in a paper plate or a paint tray liner. Take your paint roller and dip it in the Mod Podge getting a good coat on it but not too drippy. Roll the Mod Podge onto your picture just like you were painting a wall. You will need to go slowly because if you don't, there is more of a possibility that the Mod Podge will bubble in the finish. You can do a few coats, but once the Mod Podge starts to dry, let it dry the rest of the way before you try to do another coat so you don't ruin the coat that is already there. When everything is dry, you can spray your picture with a matte finishing spray that you can find at Michael's, but it isn't necessary.

Take the Mod Podge and pour some in a paper plate or a paint tray liner. Take your paint roller and dip it in the Mod Podge getting a good coat on it but not too drippy. Roll the Mod Podge onto your picture just like you were painting a wall. You will need to go slowly because if you don't, there is more of a possibility that the Mod Podge will bubble in the finish. You can do a few coats, but once the Mod Podge starts to dry, let it dry the rest of the way before you try to do another coat so you don't ruin the coat that is already there. When everything is dry, you can spray your picture with a matte finishing spray that you can find at Michael's, but it isn't necessary.
Back to the frame now. If there are any gaps where your frame corners connect, fill them with wood filler and let it dry.
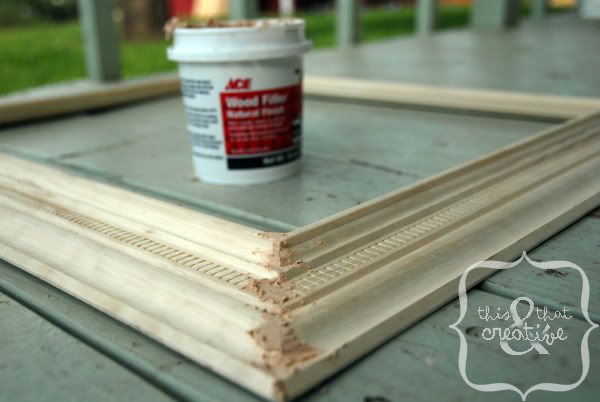
Now take your frame and sand any areas that may need sanding. You will now paint your frame the color you want. Be careful of wind and dust if you are spray painting outside. Use an even sweeping back and forth motion to spray paint. Don't spray too much in one area so you don't get an uneven look. If you are doing your project inside, you will probably not be spray painting, unless it is well ventilated. You can also use regular acrylic paint and use a paint brush to apply your paint.
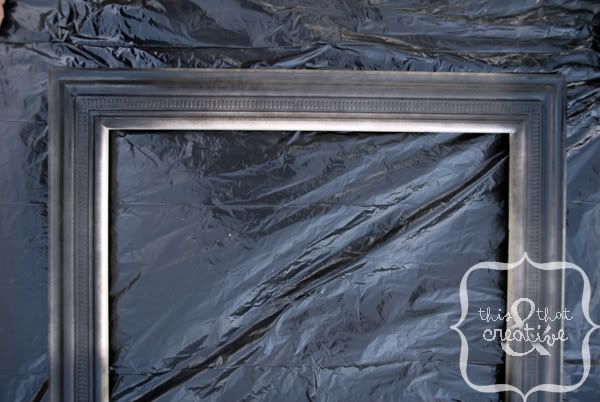
I like glossy black paint, but choose whatever your preference is. Do as many coats as you want, letting each coat dry before you do your next coat or your paint will bubble. When you are happy with the painting job, let your frame dry.
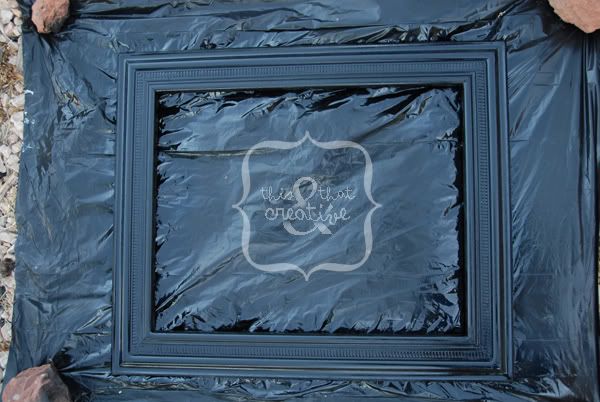
You can also coat your frame with a glossy or matte finishing spray for a more finished look if you want, but it isn't necessary.

Now take your frame and sand any areas that may need sanding. You will now paint your frame the color you want. Be careful of wind and dust if you are spray painting outside. Use an even sweeping back and forth motion to spray paint. Don't spray too much in one area so you don't get an uneven look. If you are doing your project inside, you will probably not be spray painting, unless it is well ventilated. You can also use regular acrylic paint and use a paint brush to apply your paint.

I like glossy black paint, but choose whatever your preference is. Do as many coats as you want, letting each coat dry before you do your next coat or your paint will bubble. When you are happy with the painting job, let your frame dry.

After everything is dry, insert your picture in your frame and secure it with turn button hardware or tape. If you didn't router the inside edges, you can use a staple gun to secure your picture on the backside of the frame. Just be careful to not staple it in a place that your staple may show through on the other side. You can also attached sawtooth hangers to the frame so you can hang your frame on a nail in the wall.
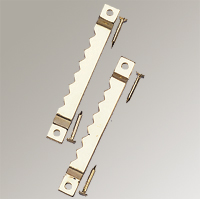
Image from HERE
There you go! Go ahead and make your own! They make great Christmas gifts!
I helped my friend, Trish, make one for a 20x30 print. She used crown molding instead of a baseboard for her frame to coordinate with the size of her print better. It honestly looks like she spent $600 on it, but nobody would guess that she made it herself and that she only ended up spending about $30 on it because she already had the crown molding and small supplies!

And for those of you that are interested in the temple prints, you can go to my Photography Blog, to view this how-to, but with prices and temple prints available to purchase included (scroll down to the end of the post), so you can make your own inexpensive project with a temple print. I also have discounted prices on orders of multiple prints in case you want to do this as a group project!
If you mention this post on This & That Creative when you contact me before December 6, 2010, I will give you 20% off on your order!

Linked up with:


Love it!!! You don't happen to have a good picture of the Salt Lake Temple do you? LOL! Thanks for sharing on my Monday Link Party!
ReplyDelete-Erika
www.misscraftypants.com
awesome expatiation on how to make wooden frame!!!
ReplyDelete