


Fonts can give a plain old blog a little something to make it sparkle! They are like the Fairy Godmothers of blogs.

Blogger gives you only a limited option of what fonts to choose.
But fortunately there is a way to work around that!
Where to get free fonts
For multiple free fonts, visit any of these:
Making your own fonts from your own handwriting to use
One of our contributors, Aliese, posted on her own blog about making her own handwriting into a True Type Font! That means you can type on your computer in your own handwriting. How cool is that?! For those of you who blog or digital scrapbook to keep a journal, this is perfect for you! Aliese does digital scrapbooking on her computer and then just posts those images on her blog to keep readers updated. Two birds with one stone! Check out how to make your own handwriting font HERE.

Changing the font for your post titles, dates, or sidebar titles (HTML)
This is probably the best way to change these fonts, although you will have to deal with some HTML. For this, I will refer you to www.kevinandamanda.com's post HERE. Amanda does an amazing job at explaining how to do this. Plus she makes some great free fonts of her own that you can snag while you are there and use them to your heart's content.
This is probably the best way to change these fonts, although you will have to deal with some HTML. For this, I will refer you to www.kevinandamanda.com's post HERE. Amanda does an amazing job at explaining how to do this. Plus she makes some great free fonts of her own that you can snag while you are there and use them to your heart's content.
Adding an image to your blog that contains a font (to add a font within your posts, pages, or sidebars without using HTML)
This might be one of the easiest ways to add a font to your blog without messing with HTML. It's really a simple way, almost so simple, you might not have thought of it. You can use this method anywhere blogger allows you to upload a picture/image, but unfortunately you won't be able to change your Post Title font this way.
1. First off, decide where you want your font---in your post, as the sidebar title, etc.
2. Create an image in Photoshop or any other image layering program (get paint.net for free HERE!), making it the size you want to show up on your post, page, or blog sidebar. Start out with the background as transparent, or choose the same color as the background of your blog. If you change backgrounds frequently, choose to start it out with a transparent background rather than your current background color.
2. Create an image in Photoshop or any other image layering program (get paint.net for free HERE!), making it the size you want to show up on your post, page, or blog sidebar. Start out with the background as transparent, or choose the same color as the background of your blog. If you change backgrounds frequently, choose to start it out with a transparent background rather than your current background color.
Then, type in what you want it to say. You can also make it as decorative as you want.
3. If you chose a transparent background, save the image as a png, then select none for interlaced as you save it to your computer. If you chose the background color to be the same as your blog background or another color, you can save it as a jpg on your computer.
4. Now let's put those images where you want them.
- For inside your posts or pages:
All you have to do is select the ADD IMAGE button
while editing your post or page.

Upload it from your computer, and then put it where you want it. If it
showed up smaller than you made it, blogger automatically
resized it. Chances are that this won't happen
unless you made your image wider than 350px or so.
Click HERE to find out how to make it bigger.
I used this technique on our Link-Ups Page.
Before:

After:

- For your sidebar titles:
If you want to use this way to make your sidebar titles a different
font, let's say the BLOG ARCHIVE section as an example,
this is what you would do. Select your DESIGN tab and
go to PAGE ELEMENTS where you can edit your gadgets.
Edit your BLOG ARCHIVE gadget and delete the title
(it will be the first box), and then save it. Go back
to your PAGE ELEMENTS layout, and click on ADD A GADGET.
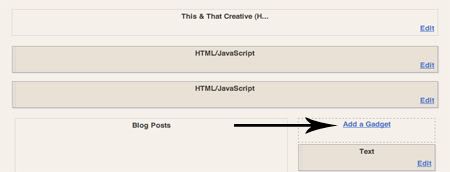
Then all you need to do is select to add a PICTURE.
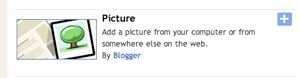
Upload your image and drag this gadget above your
BLOG ARCHIVE gadget or whatever gadget you want it to be
a title for. For me, there is just barely more of a gap
between the gadget and the title than I'd like, but for
not even messing with HTML, it's an easy way to add
a little something to a plain blog!

Getting rid of the border around your images that contain fonts
Depending on your web browser and blog template, sometimes you will see an outlining border around the images with fonts that you have uploaded. If this bothers you, you can go HERE for instructions on how to remove it.
***If you have done the steps to get rid of the border
around your image, but still see a little something
around it, you are the victim of the pesky
box shadow in your blog template.
Here is how to fix this:
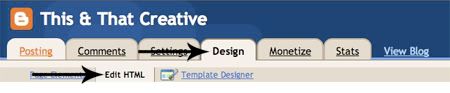
Go to the Edit HTML Tag in your DESIGN tab.
If you see a code like the one I've highlighted below in your EDIT TEMPLATE box,
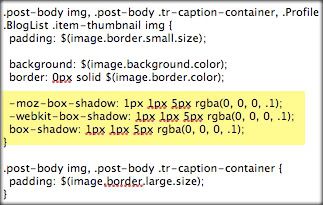
change it to what I have highlighted here:
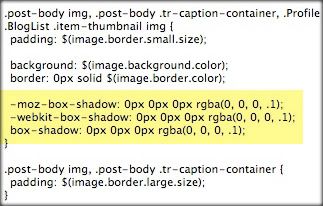
Basically, you are just changing the 1px 1px 5px on each row
that is highlighted to: 0px 0px 0px.
Preview, and save your changes. View your blog, and
the shadow should be gone!
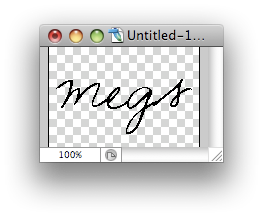
Signing a signature after your post
You will start out this method just as you did with the the last section in steps up to step 3, but this time the text will be your signature. You can even use your own True Type Font in your own handwriting like mentioned above so it will look like your real signature! For this particular one, I chose the Sunshine in My Soul font from dafont.com.
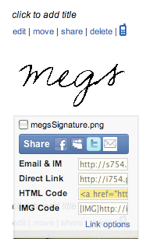
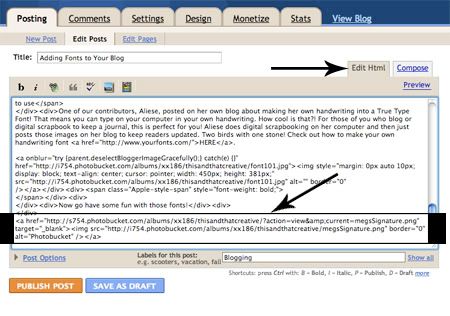
4. Then you will upload it to an image hosting site like Photobucket. Once you have saved it, it will give you options of different ways to use your image. Copy the HTML code.
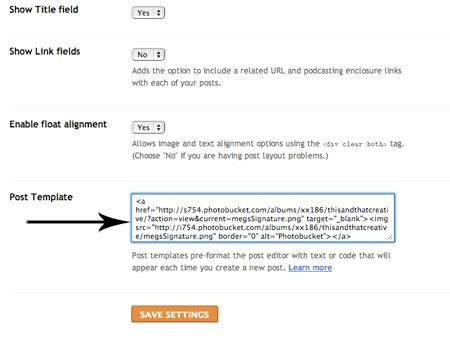
5. Go to your blog's SETTINGS tab, then click on the FORMATTING option.

Scroll to the bottom and you will see a box that says POST TEMPLATE. You will paste the HTML code for your signature in that box. Save settings, and then you will see your signature at the bottom of each post you do!
If you haven't removed the border around your signature yet (and if it bothers you), see the last section on how to remove it.
***If you have multiple contributors for your blog, this signature will be posted no matter who is posting. You don't want "Jill's" signature on "Jackie's" post. In this case, the other person/contributor whose signature it does not belong to, can just delete it while they are posting OR you can save the HTML code of your signature somewhere on your computer where you can quickly find it and copy it whenever you post. Click on the EDIT HTML tab (next to COMPOSE on the top right of your box) while you are editing your post. Scroll down to the bottom and paste your code at the end of your post.
Click back to COMPOSE, and you will see your signature at the end of your post! You will have to do this for each post that you want your signature on if you do it this way.
Now go have some fun with those fonts!

When you go to the websites to get free fonts, is there a particular way to save the document you download? Mine are zipped files and I don't know how to access them or open them to use them in my posts.
ReplyDeleteWhen I right click on a zipped file, it opens, and I can see the contents in the folder. It does depend on your operating system though. Here are some links that may help you out.
ReplyDeletehttp://www.tech-pro.net/howto-open-zip-file.html
http://www.wikihow.com/Open-a-.Zip-File-Without-Winzip
Let me know if these help! If they don't--I can talk to my helpful computer geek husband for more info ;)
I was looking at you wbsite,Michael Vick Jersey which is wonderful, and noticed that you have a postcard published by my cousin, Mathew Gardner. I am currently researching our family history and wondered if you had Authentic NFL Jerseys Cheap the original postcard and any other information whih has not been published on your website.
ReplyDeleteI have some information which I would be happy to furnish if you wish to get in touch.Cheap Steelers JerseysLooking forward to hearing from you.
Asante Samuel Jersey
Brandon Graham Jersey
Nnamdi Asomugha Jersey
Dominique Rodger Jersey
Vince Young Jersey
Brian Westbrook Jersey
Mike Quick Jersey
Nathaniel Allen Jersey
Donovan McNabb Jersey
Stewart Bradley Jersey
Thanks you so much for this nice post here..Would like to hear more from you..
ReplyDeletemichael kors outlet
ReplyDeletereplica watches
tods outlet
nhl jerseys
louis vuitton neverfull sale
air max 90
ed hardy tshirts
jordan pas cher
foamposite shoes
bottega veneta outlet online
valentino outlet
louboutin pas cher
nike free running
oakley sunglasses
louis vuitton outlet
polo ralph lauren
michael kors handbags clearance
uggs outlet
louis vuitton handbags
moncler outlet
ugg boots
nike huarache
polo shirts
nfl jerseys wholesale
louis vuitton outlet
michael kors outlet clearance
mont blanc pens
uggs clearance
reebok shoes
christian louboutin online
the north face jacket
ray ban sunglasses
tiffany and co
michael kors uk outlet
coach outlet
20160827caihuali