


Making your own buttons helps to add a personal touch to your blog. They can make your blog fun, decorative, unique, and most of all, they are functional!
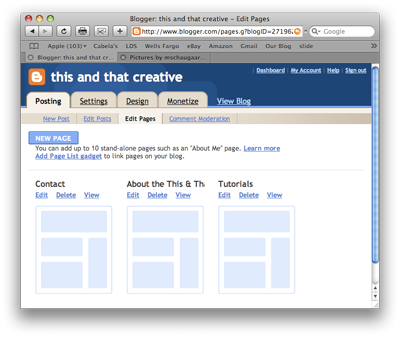
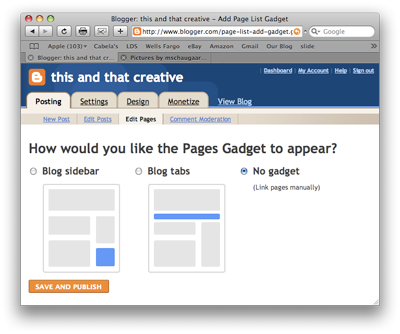
It gives you the option to create a NEW PAGE. Click on that. You can create up to 10 pages. This is so you can have constant stand-alone pages that your viewers can look at such as an "about me" page that isn't necessarily as a blog post. Create your new page, then when you save your page, you need to remember to select NO GADGET:
You will then click on the SAVE AND PUBLISH button. It will give you the option to view the page. After you view it, copy the PAGE URL (the http://.... address you are at) and save it somewhere for future reference. Make sure you know what page this url will link you to if you are doing multiple pages. You will then make the buttons to link to your pages.

On your blogger tabs, there is one that says DESIGN, Make sure you are on the PAGE ELEMENTS tab. You will click on that, and you will see something like this:
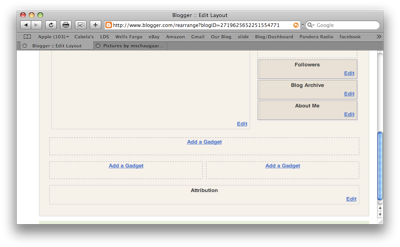
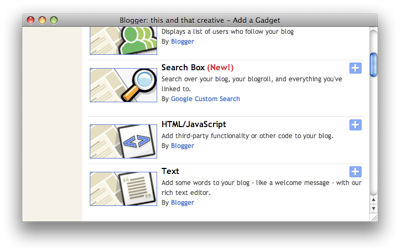
You will click on one of the ADD A GADGET options, then you will see something like this:
You will then click on HTML/JAVASCRIPT, and insert each of your button codes in the order that you want them to go in. Do not type in a title. This is what mine looks like:
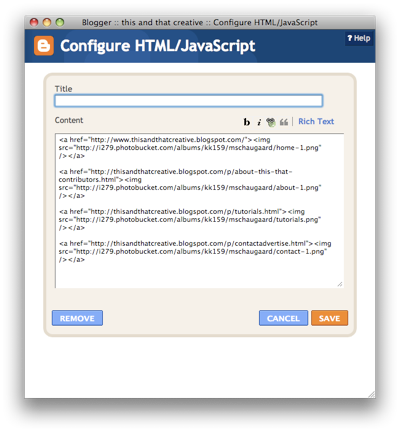
I have multiple codes in the box because I wanted multiple buttons to make up a menu bar. Remember that for your home button, you will not have a page url because that will just be the address of your blog. You will insert your blog address as the PAGE URL into the home button code. One mistake that I made before, was that I just put in www.thisandthatcreative.blogspot.com without the http:// in front of it. So remember to do that.
This post will give you the steps to make your own buttons to link to your blog pages, and how to make your pages. It will also teach you how to make a button that has a unique shape. If you want your buttons to connect to another site or to certain blog labels, etc. instead of linking to your pages, you can just skip step number 1 and just replace the PAGE URL in the instructions with the web address you want your button to link to. You can include buttons anywhere you have the option to use HTML/JAVASCRIPT!
Step 1: Make your pages
In blogger on your blog dashboard, click on DESIGN. Under POSTING you will find an EDIT PAGES link next to where you find your EDIT POSTS link:


Step 2: Make your button images
Blogflux has a tool that can help you make the buttons and eliminate the extra steps that take time, like photoshop and illustrator. Personally, I like to take the extra step to do my own.
With our buttons that are on this blog right now, I grabbed some free for commercial and personal use images that I liked and shrunk them down in photoshop to 150 pixels wide. Also, you don't have to use photoshop, there are other free image editing programs you can use online. You can make just a simple image like a circle or a rectangle and put some text on it. If you have picture that you took and like, you can go ahead and use that too. Make the images bigger or smaller to fit your preference. After I was happy with the size and background, I added some text from a font I liked. Check out dafont.com for some cool fonts. Most of them are free for personal use.
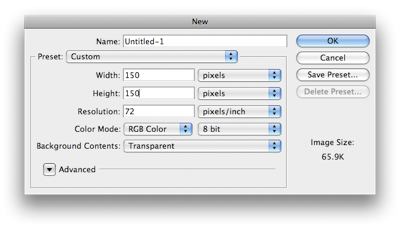
After creating my button, I saved it as a png file on my computer because I wanted to leave the background transparent. If you are making a button from scratch that isn't rectangular or square, start off your image with Transparent as your selection in Background Contents like shown below in Photohop. When your new image shows up, it will show a gray and white checkered background that indicates that that part is transparent.
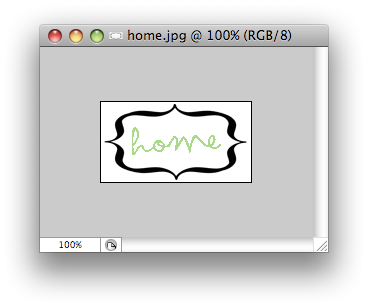
Here is the button image shown as a png:
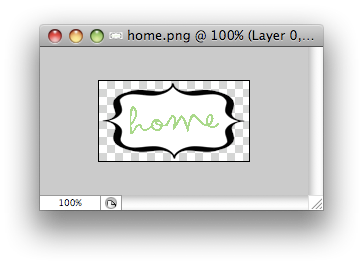
(notice the unique shape---it's not just a rectangle). If you are doing a rectangular or square button, you can save it as a jpg, and it will work just fine!


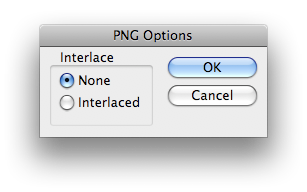
Then when I saved my image as a png on my computer, this box came up, and I made sure to select None for Interlace.

This is what it would look like if I did save it as a jpg:
You will notice that it does not have the checkered background indicating that the background is transparent. If I wanted to change my blog background color to the blue, and I had my home button saved as a jpg instead of a png, a white rectangle around my button would appear:


Step 3: Upload your button images to an image hosting site:
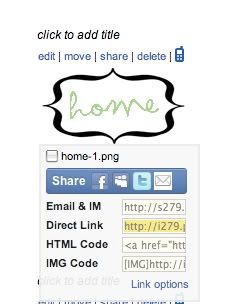
After you have your buttons made, upload them to a image hosting site. I use photobucket, but you can use any of the others that are out there like Flickr, Tinypic, etc.
After you upload your images it will give you some options. This is how it looks on photobucket:

I have the BUTTON IMAGE DIRECT LINK highlighted in yellow in the previous picture. You will want to copy that link and save that for future reference, like you did with your PAGE URL. And, like before, you will want to make sure you remember what button image goes with what direct link.
Step 4: Make your code
In the previous steps, you were told to save the PAGE URL and the BUTTON IMAGE DIRECT LINK. Now you will combine the matching page to its matching button in a code. Copy the code from the box I have provided, but insert your URLs where directed.

Use the code to make a separate code for each button.
Step 5: Insert your code


Save your code. Go back to DESIGN, PAGE ELEMENTS, and click and drag your new HTML/JAVASCRIPT gadget to fit underneath your header, or wherever you want your buttons to appear. Save and view your blog! Your buttons should be there!
If you have any questions just leave a comment, and I comment back and try to see if I can help.
Also, I'd love to see your buttons! Leave a link to your blog in the comments if you want to share what you've made!
Happy button making!
This is A-MAZING! I've never attempted this before but I think I may have to...
ReplyDeletefound your site on theladybloggers. your buttons are a great idea. love it.
ReplyDeleteElle @ A Galley Slave
www.agalleyslave.blogspot.com
This is the best button tutorial ever! It was super easy to follow, and helped a ton! Thank you for making our blog cuter!
ReplyDeleteThank you so much for this!! It has taken me a few days to get it right but it had taken me months to find the answer!!
ReplyDeleteTHANKKKKK YOOUUUUUUU!!!!!!
Really decent post I simply unearthed your weblog and wished to say that I have genuinely delighted in searching your weblog posts. Much obliged man.
ReplyDeleteI additionally very similar to the design and elegance of your website thought it's truly terribly clear and easy to work.
ReplyDelete20170925 junda
ReplyDeletecoach outlet store online
cheap soccer jerseys
ralph lauren polo
longchamp pas cher
yeezy boost 350
oakley sunglasses sale
ray ban sunglasses
swarovski jewelry
uggs outlet
swarovski crystal
20180519xiaoke
ReplyDeletemichael kors outlet clearance
air jordan shoes
minnetonka outlet
salomon shoes
reebok trainers
james harden shoes
ralph lauren pas cher
oakley sunglasses wholesale
ray ban sunglasses outlet
true religion outlet uk
20180621 junda
ReplyDeletekevin durant jerseys
soccer jerseys
canada goose outlet
nhl jerseys
michael kors handbags
coach factory outlet
kate spade outlet
kd 9
nike store uk
coach factory outlet
20181006 junda
ReplyDeleteraptors jerseys
ugg outlet
cheap jordans
adidas nmd
canada goose outlet
cheap mlb jerseys
christian louboutin outlet
polo ralph lauren
cheap jordans
air huarache
فهي عندها التمكن من الانتشار داخل البيوت والشركات والفلل والمصانع فهي قادرة على التعايش داخل أي موضع فتقوم شركتنا باستعمال أفضل أشكال المبيدات العاملة على السيطرة على الجهاز التنفسي للصرصار وتقوم بالقضاء اللحظي علية مع ضمان عدم رجوعه مرة ثانية.
ReplyDeleteشركة مكافحة حشرات بالطائف
شركة عزل خزانات بالطائف
شركة مكافحة النمل الابيض بالطائف
christian louboutin shoes
ReplyDeletemoncler jackets
goyard tote
valentino
kyrie 5
golden goose outlet
coach outlet
yeezy shoes
christian louboutin
nike epic react flyknit
Thanks for sharing this super helpful guide. I really appreciate your effort.
ReplyDeleteHow to Make a Transparent Background in Pixlr