


Luckily for me, you can make your pictures bigger!
Here is my image uploaded by blogger:

Here is my image uploaded the new way:

When I save my images on my computer, I adjust the size to to fit within the size of my post. This depends on the layout of your blog, but you should be safe to save the longest length of your picture to 400 pixels (while constraining proportions). This particular image is saved 600 pixels by 402 pixels.
After you change the size, you will need to upload your pictures to an online image hosting site. I use Photobucket, but you can use any online image hosting site. If you have multiple images, use the bulk uploader:

The yellow arrow is pointing to it. I like it because it's fast!
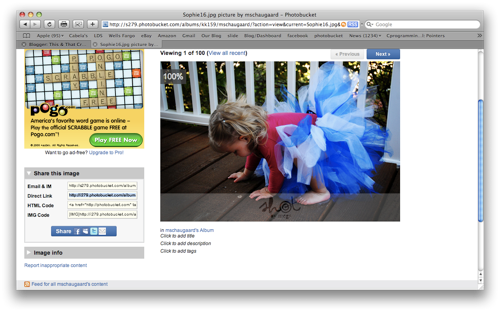
You do also have the option to resize your image in Photobucket if you forgot to save it to the size you wanted it on your computer, but make sure to resize it before you take the next steps. After you save your image, you will have access to codes for you to use to share your image. This is after I clicked on my image after it had been saved:

I have the HTML Code highlighted in blue in the picture. You will copy that code.
When you are posting on your blog, you have a tab at the top that says EDIT HTML:

Click on that tab and insert your code where you want your picture. If you go back to the COMPOSE tab...TA-DAH! Magically you will be able to see your picture! You can cut and paste and align it to your liking in Compose mode, just as if you uploaded it through blogger. One good idea, is to pick all the pictures you want in your post and put them all in the post in HTML mode before you type any words. It makes it easier because switching back and forth to HTML mode if you don't know too much about HTML can get confusing. While pasting my pictures in HTML mode, I make sure to separate each picture by pressing enter a couple times before inserting a new one. It just makes it less messy and easier to edit in Compose mode later.
Another way, if you don't even want to mess with the HTML mode, is that while you are in Photobucket, copy the Direct Link of your picture instead of the HTML Code. It's highlighted in blue in the picture below.
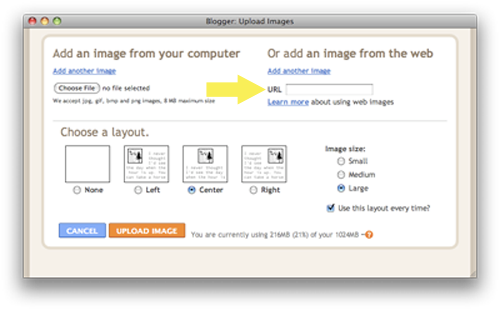
Take the steps that you would normally take to add a picture file from your computer...except for this time, instead of adding the image from your computer, paste the Direct Link that you copied in Photobucket, and insert it as the URL in the "Or add an image from the web" section.
You can copy and paste and edit these after they are uploaded on your post, just like you normally would!
I actually think that for me, these ways seems a little faster than uploading your pictures through blogger--even with the extra steps. It's probably because I am doing something the whole time instead of waiting forever for all of them to load. So emphasis on the "seems". But I do get to have big pictures!
Now go post some bigger pictures on your own blog!
Happy Blogging!
nike cortez
ReplyDeletenike air max 95
adidas superstar shoes
kd 10
lebron shoes
yeezy 500 blush
bape clothing
yeezy boost
golden goose francy
yeezy sneakers
Thanks allowed me to comment in here, Your Articles are very good and interesting.
ReplyDeleteAlso visit our website in :
togel singapore
togel hongkong
togel hari ini
Thanks allowed me to comment in here, verry informative post, i'm so interesting
ReplyDeleteAlso visit our website in:
judi slot online
situs judi slot
prediksi hk malam ini